How to Choose the Best Camera for Computer Vision (2026)
Most guides on choosing a camera for computer vision start with technical specs like sensor sizes, frame rates, and resolution charts. They make buyers believe that the camera with the highest resolution or fastest frame rate is automatically the best one.
But in real deployments, the camera fails for reasons that have nothing to do with the spec sheet. It could be mounted at the wrong angle, footage could take too long to reach your software, or the cheap sensor might not perform anywhere close to what the box promised.
By the end of this guide, you’ll know how to pick a computer vision camera that works for your project. We’ll cover use cases, key tradeoffs, installation rules, and real-world examples of computer vision camera deployments. If you want the complementary deep dive into sensor, lens, chip, and software internals, see our earlier article on choosing a camera for computer vision wisely.
Let’s dive right in.
What is a camera for computer vision?
A camera for computer vision is a specialized imaging device chosen and configured specifically for machine analysis rather than human viewing.
Computer vision cameras prioritize consistent frame rate, low motion blur, predictable latency, and pixel density on the target object over aesthetic image quality. The right model depends entirely on the use case.
Five use cases that impact every other camera choice
There’s no one-size-fits-all perfect camera for every computer vision project. The right model depends on what you’re trying to see, how fast it moves, how much light you have, and what the system has to do with the result.
Before you compare a single spec sheet, you need to know which of these five use cases describes your project.
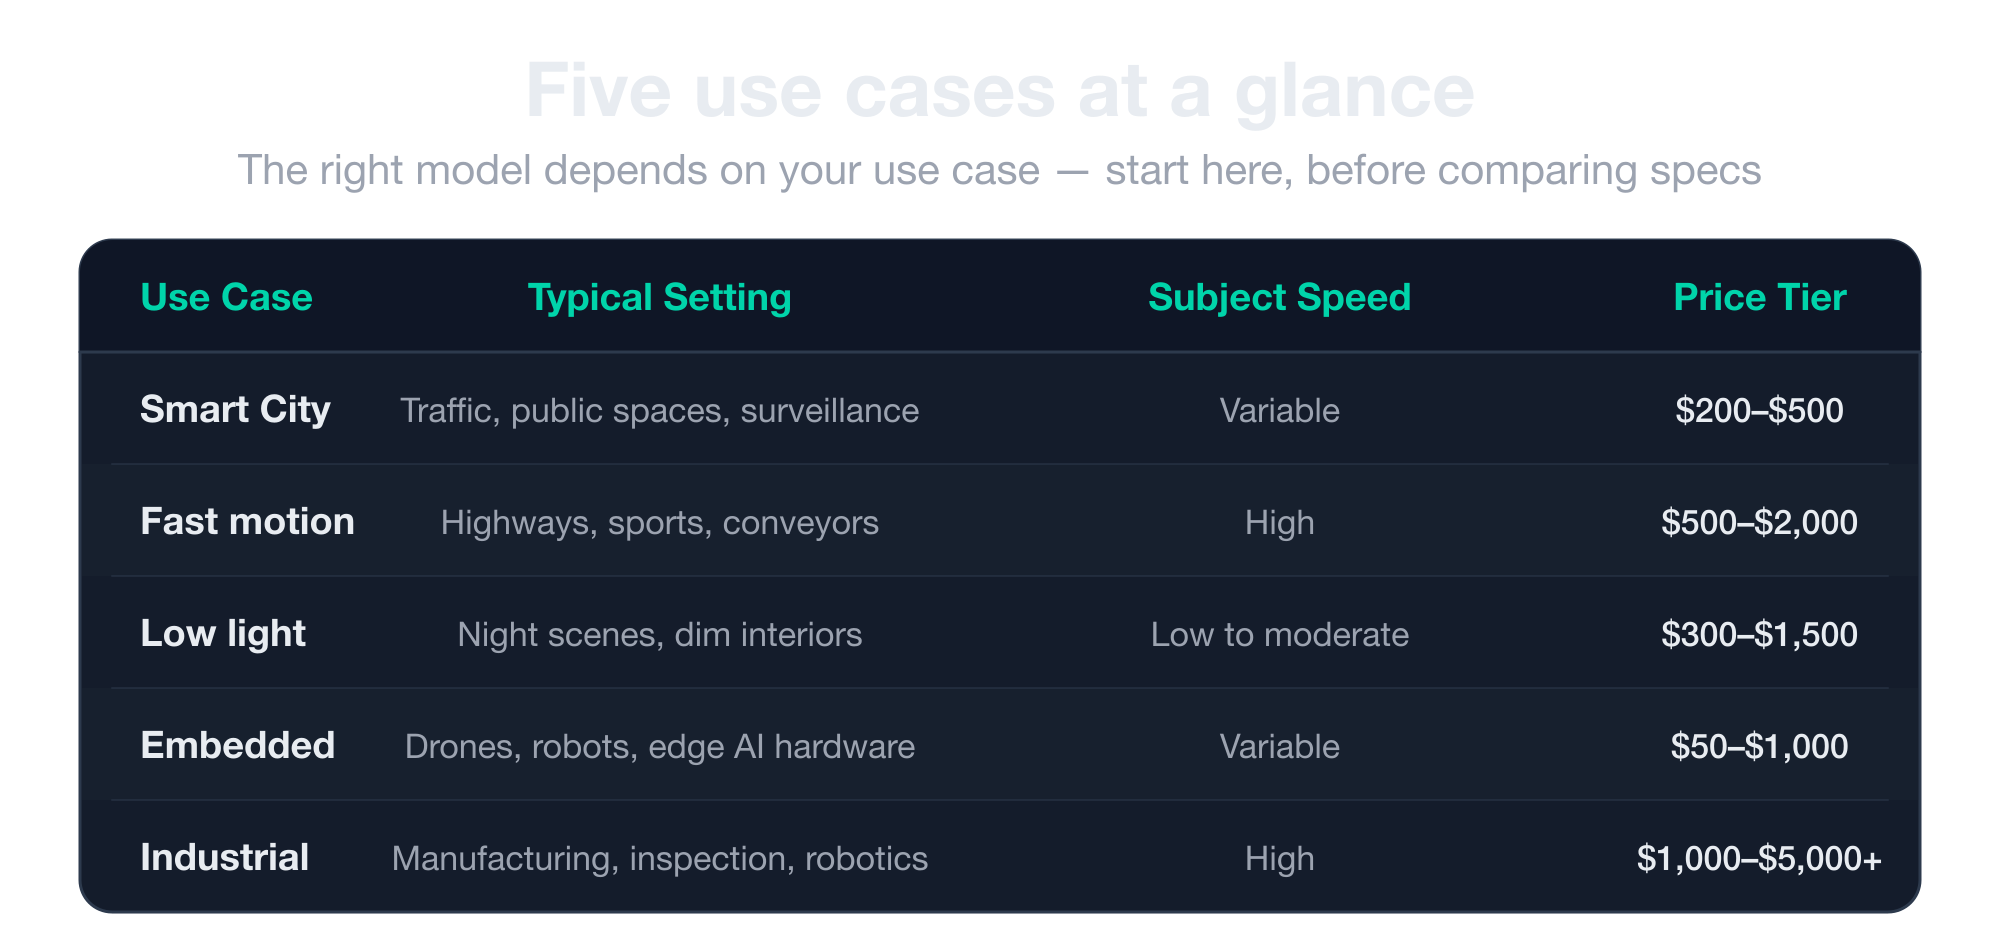
Smart City
Smart City cameras are stationary or semi-stationary, sometimes mounted on slow-moving vehicles, and they observe public space. These cameras specialize in one of two directions.
Some are built to see distant objects clearly, like license plates on a highway or text on a building. Others are built to see broad areas where each object occupies very few pixels, like crowds in a square or vehicles across an intersection.
You cannot have both in one camera. You’ll first need to decide between wide coverage and narrow detail to determine which lens, sensor, and resolution you actually need.
Fast motion
Fast-motion cameras can capture moving subjects like cars on a highway, athletes mid-stride, animals crossing a frame, and parts flying down a conveyor without blur.
These setups demand fast shutter speeds, which immediately cascade into higher light sensitivity requirements and often push you toward global shutter sensors.
Get this wrong, and your footage will likely smear at the exact moment you need detail. These cameras handle non-cooperative recognition tasks, such as reading license plates or matching faces on a moving subject, which is why they’re among the most expensive CV problems to solve.
They also tend to power trigger-based systems that have to react in real time, like red-light enforcement or factory safety alerts, which makes latency a separate problem on top of motion blur.
Low light
Low-light cameras are for scenes shot at dusk, indoors with poor ambient lighting, or at night. Here, sensor sensitivity, lens aperture, and IR-mode support matter far more than resolution. A 4K camera with weak low-light performance is useless after 6 PM.
The tradeoff is that you get to see in the dark, but only if you accept either a slower shutter that blurs moving objects or a more expensive sensor that pulls in more light.
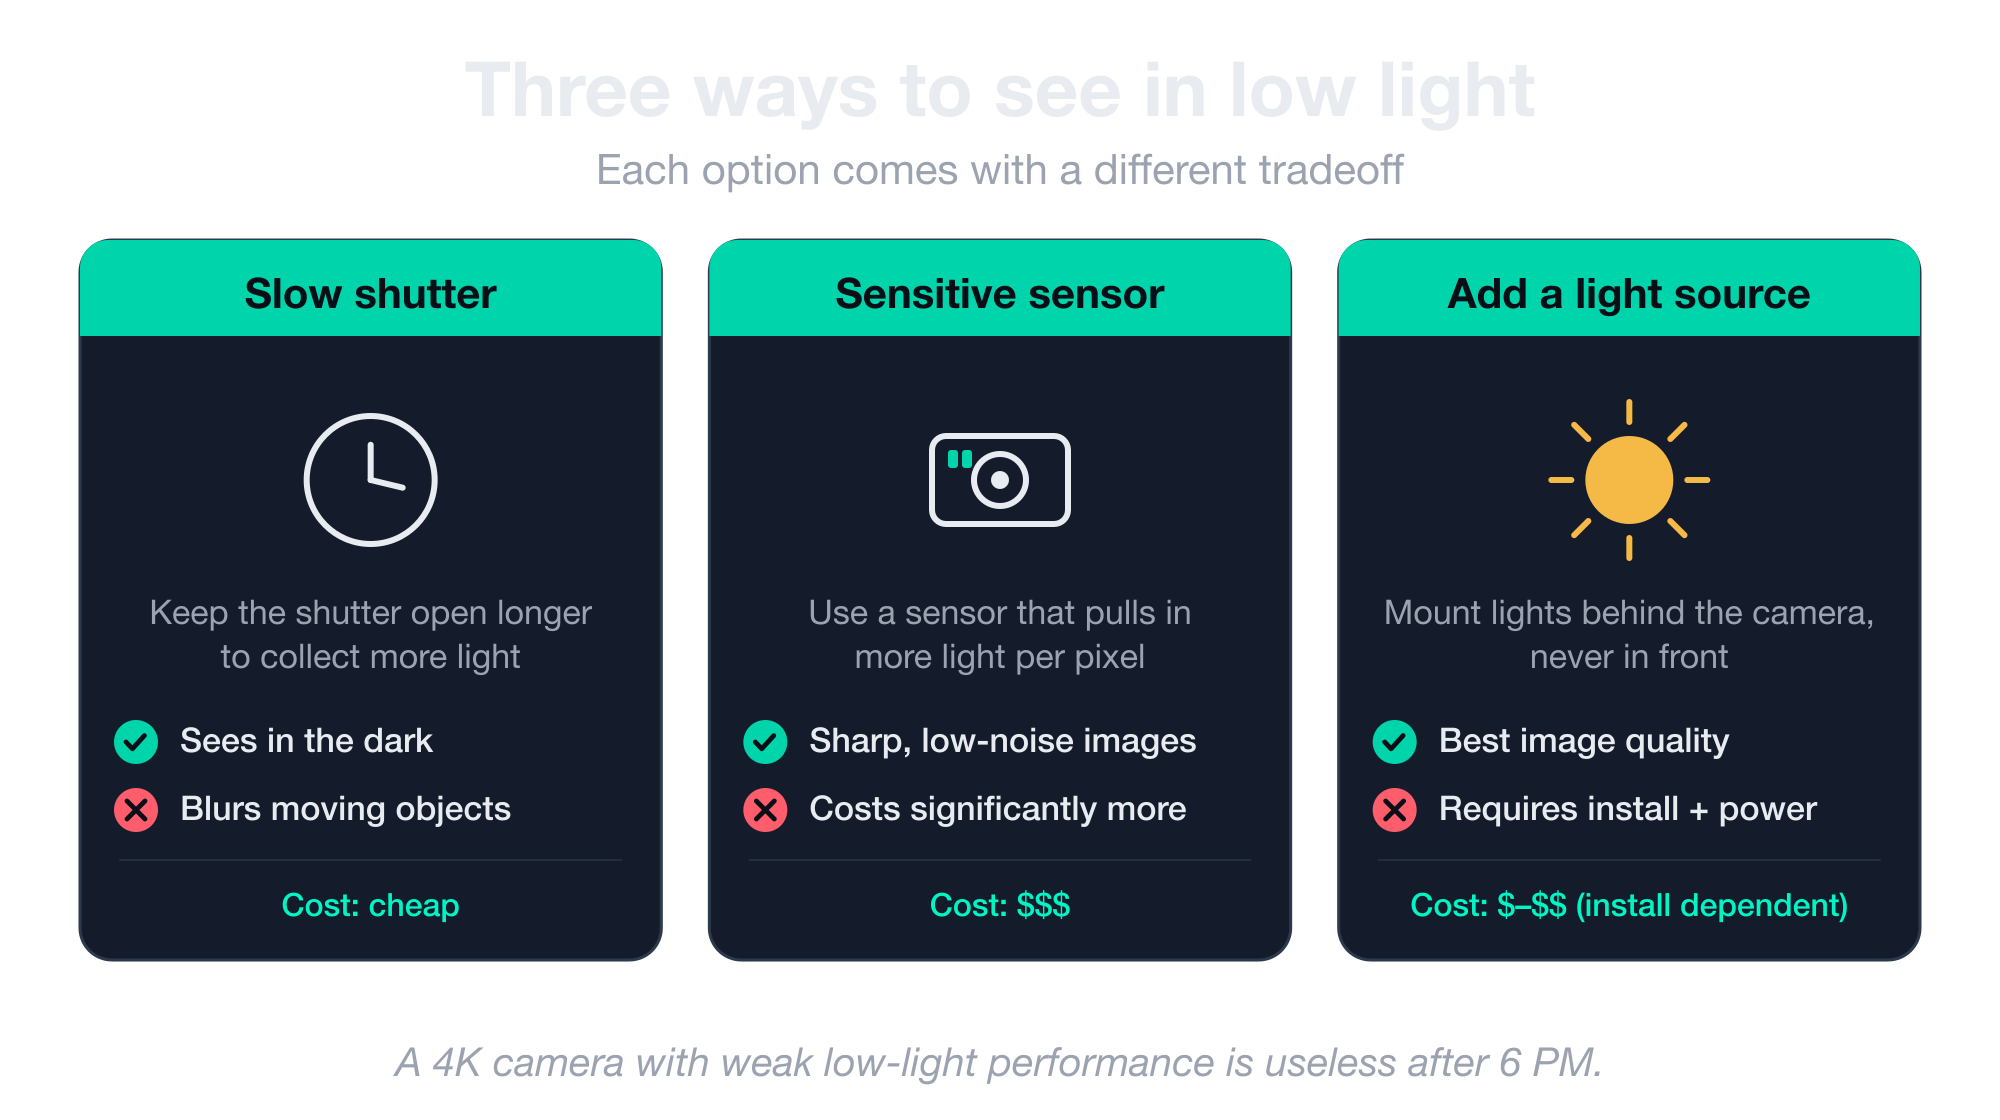
Many deployments solve this by adding their own light source, but that only works if the light is positioned behind the camera rather than in front of it.
Embedded
Embedded cameras are integrated into a device with tight compute and bandwidth constraints. Drones, robots, AR headsets, smart appliances, and edge AI hardware all fit this category.
Electrical constraints matter more than optical ones here. Data has to land in the processor or GPU memory fast enough for real-time inference, which usually means connectors like MIPI CSI-2 instead of standard Ethernet.
Power draw is also important because the camera shares a battery with everything else. Size matters because the camera has to fit inside a 3-inch drone or a robotic arm. These cameras are designed to match their host system.
Industrial
Industrial cameras are for manufacturing inspection, robotics, conveyor lines, and other controlled environments where the camera has to deliver 300+ frames per second with zero distortion, often in grayscale.
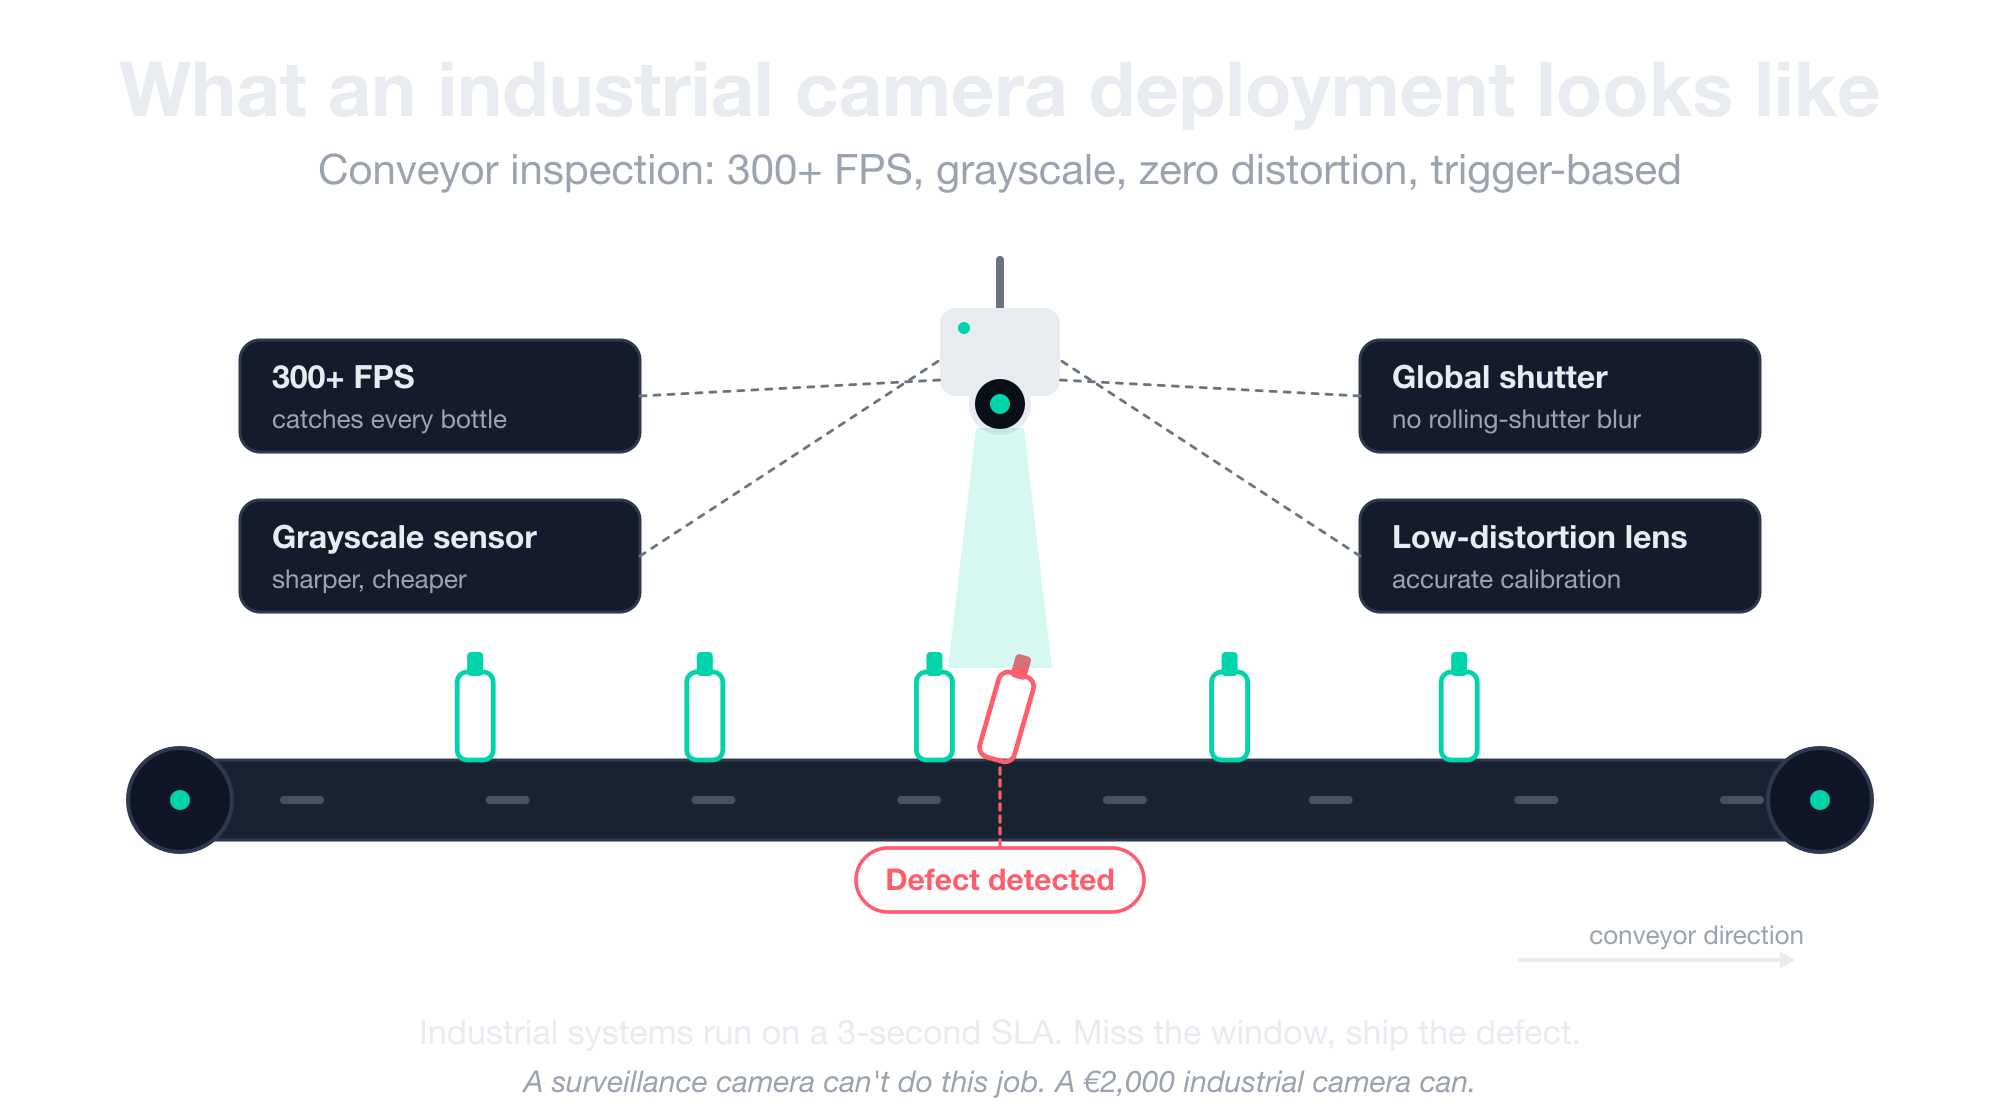
They typically feed trigger-based systems where a 3-second response window is the upper limit. Anything slower and a worker has already fallen, a defective product has already shipped, or the robot has already moved past the target.
This is a completely different vendor ecosystem from surveillance cameras. Expect different connectors (CSI-2, USB3 Vision, GigE Vision), different price tiers (a 640×480 grayscale industrial camera can cost €2,000 when only one vendor makes it), and different physics.
Global shutter and low-distortion lenses come standard because industrial systems depend on calibration accuracy. Color sensors usually cost extra, since the demosaicing chain adds complexity that not every buyer needs.
Three tradeoffs you can’t ignore with every CV camera
Every camera spec sheet is a compromise on three things. You can’t have all three at once, and the sooner you understand that, the sooner you stop looking for the highest megapixels.
Instead, you can start picking the camera that actually fits your project. These three tradeoffs come up in every CV deployment, and the rest of this guide will refer back to them by name.
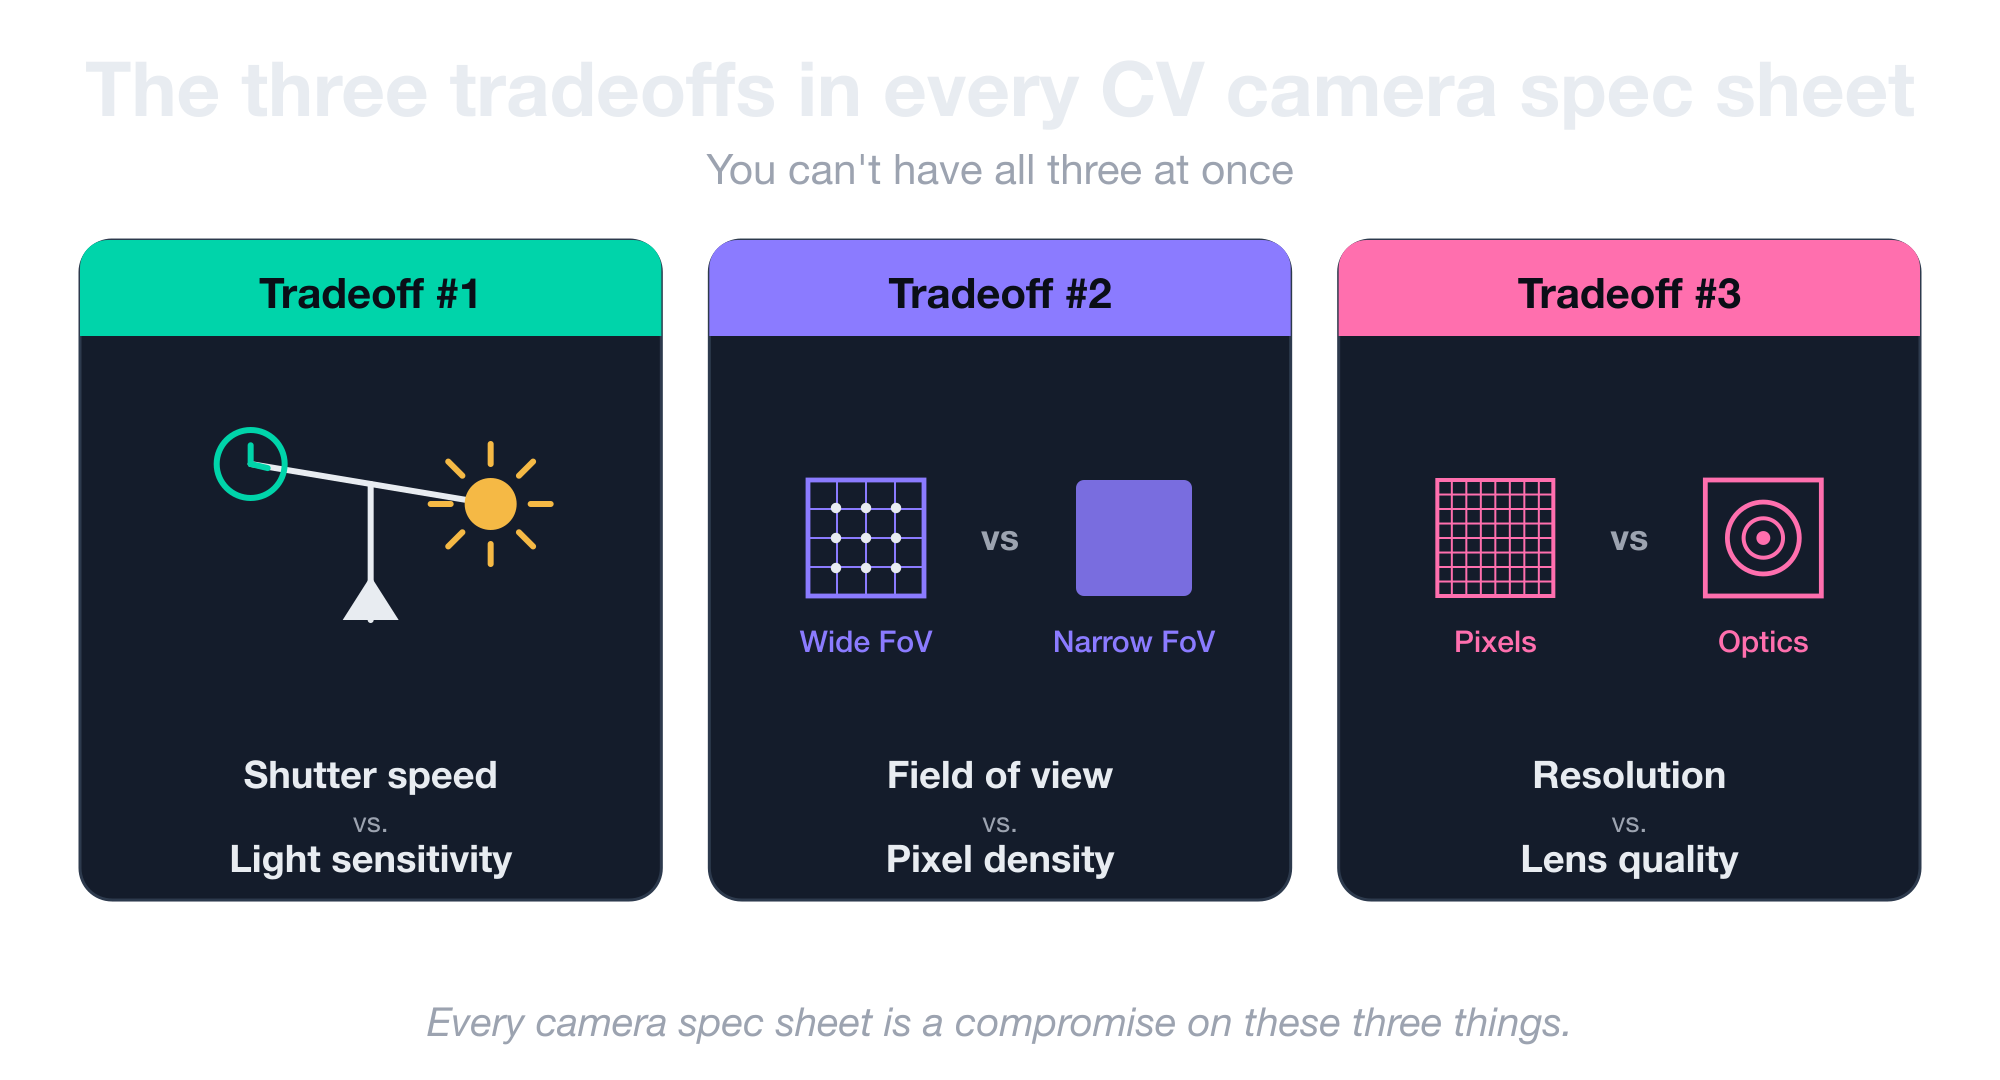
Shutter speed vs. light sensitivity
A faster shutter means less light reaches the sensor. That’s the whole tradeoff, and it cascades into every other decision you make.
If you want to freeze a moving subject without blur, you need a fast shutter. But a faster shutter means a shorter window for photons to hit the sensor, which means the image comes out dark unless you compensate somewhere.
You have three ways to compensate for this. You can buy a more sensitive sensor (which costs more), add ambient or supplemental lighting (which isn’t always possible), or accept some amount of motion blur (which defeats the purpose).
This is why fast-moving subjects in dim conditions are the hardest computer vision problem to solve. It’s also why non-cooperative recognition tasks like reading plates or matching faces on moving targets cost what they cost.
Field of view vs. pixel density
A wide field of view shows you a lot of space and very few pixels per object. A narrow field of view shows you one thing in fine detail and misses everything else. There is no single camera that does both.
![]()
Whatever lens you use determines whether you see the whole intersection or one license plate within it, but never both at the same time.
This is why most serious CV deployments use multiple cameras with different lenses, or why specialized installations like airport corridors use long-focal cameras that trade peripheral vision for reach.
Resolution vs. optics
This is the most counterintuitive rule in CV camera buying. A Full HD camera with the right lens, fast shutter, and good light sensitivity beats a 4K or 8K camera with a wide-angle, blurry lens for almost every CV task.
Optics determine what reaches the sensor in the first place. Adding more pixels behind a bad lens just gives you a higher-resolution version of a useless image.
When you compare two cameras, and one has more pixels, buy the one with better optics first, then worry about resolution.
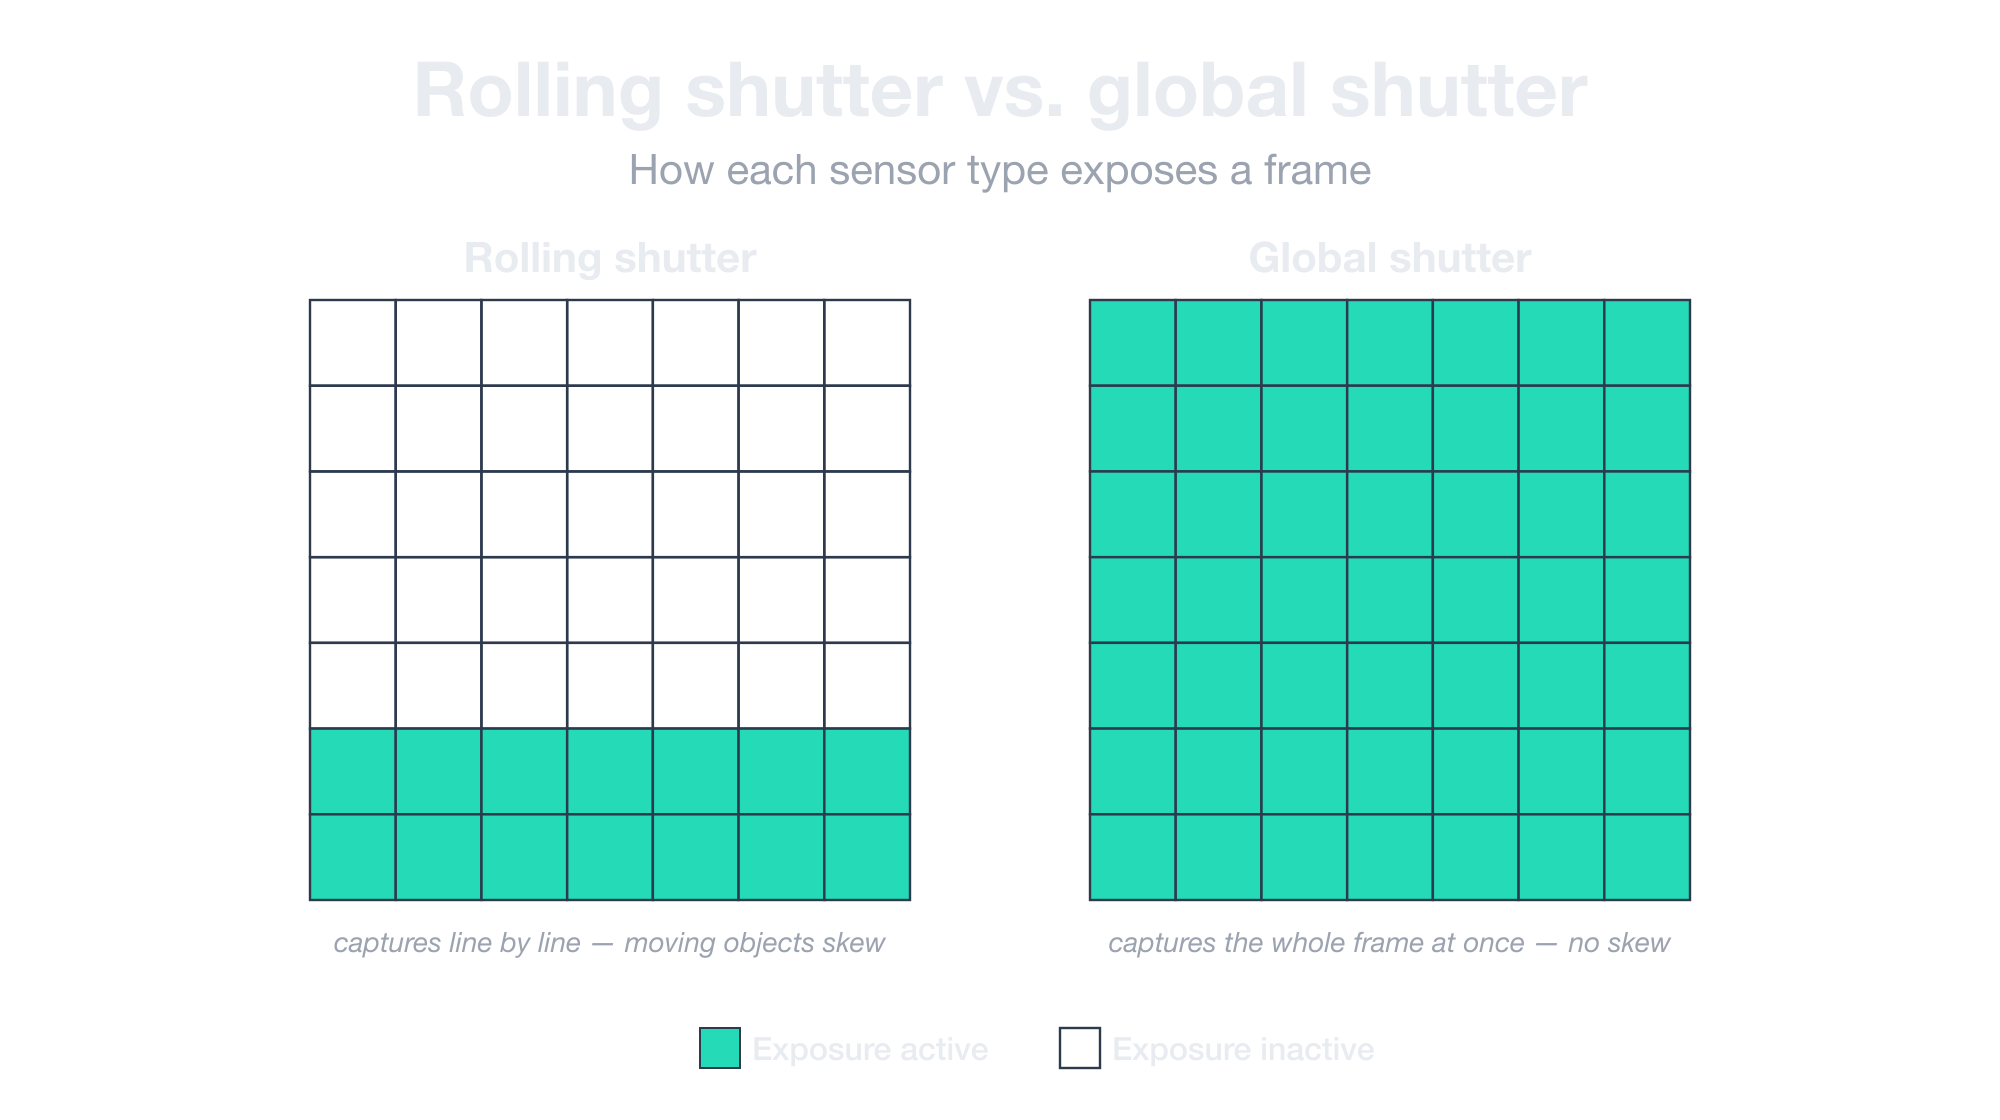
Rolling shutter vs. global shutter: which one do you actually need
Rolling shutter cameras capture the frame line by line, which means anything moving sideways during the capture comes out smeared.
This is the source of the blur you see on cheap license plate recognition cameras when a plate is viewed at an angle. The plate moves across the frame faster than the sensor can read it, and each row of the image arrives slightly offset from the last.
Global shutter cameras capture the whole frame instantly with no blur, no skew, and no rolling artifacts.
The Basler whitepaper comparing the two is worth reading if you want the technical details, but the practical decision is simpler than the explanation:
- If your subjects move fast relative to the camera, you need global shutter.
- If they move slowly or not at all, a cheaper rolling shutter camera will do the job.
Now here’s the catch: global shutter cameras cost significantly more, and many surveillance vendors don’t even sell one.
Before you start comparing models, ask the OEM directly whether their lineup includes a global shutter option. If the answer is no, you’re shopping in the wrong segment.
How to mount your camera (and why it matters more than the camera itself)
The single most important variable in any computer vision deployment is how the camera is mounted. Spec sheets almost never mention this, which is why it gets overlooked, which is why deployments fail in production after working in the PoC.
Here’s the thing most people miss: a perfect camera in a bad position will lose to a mediocre camera in a good one every time.
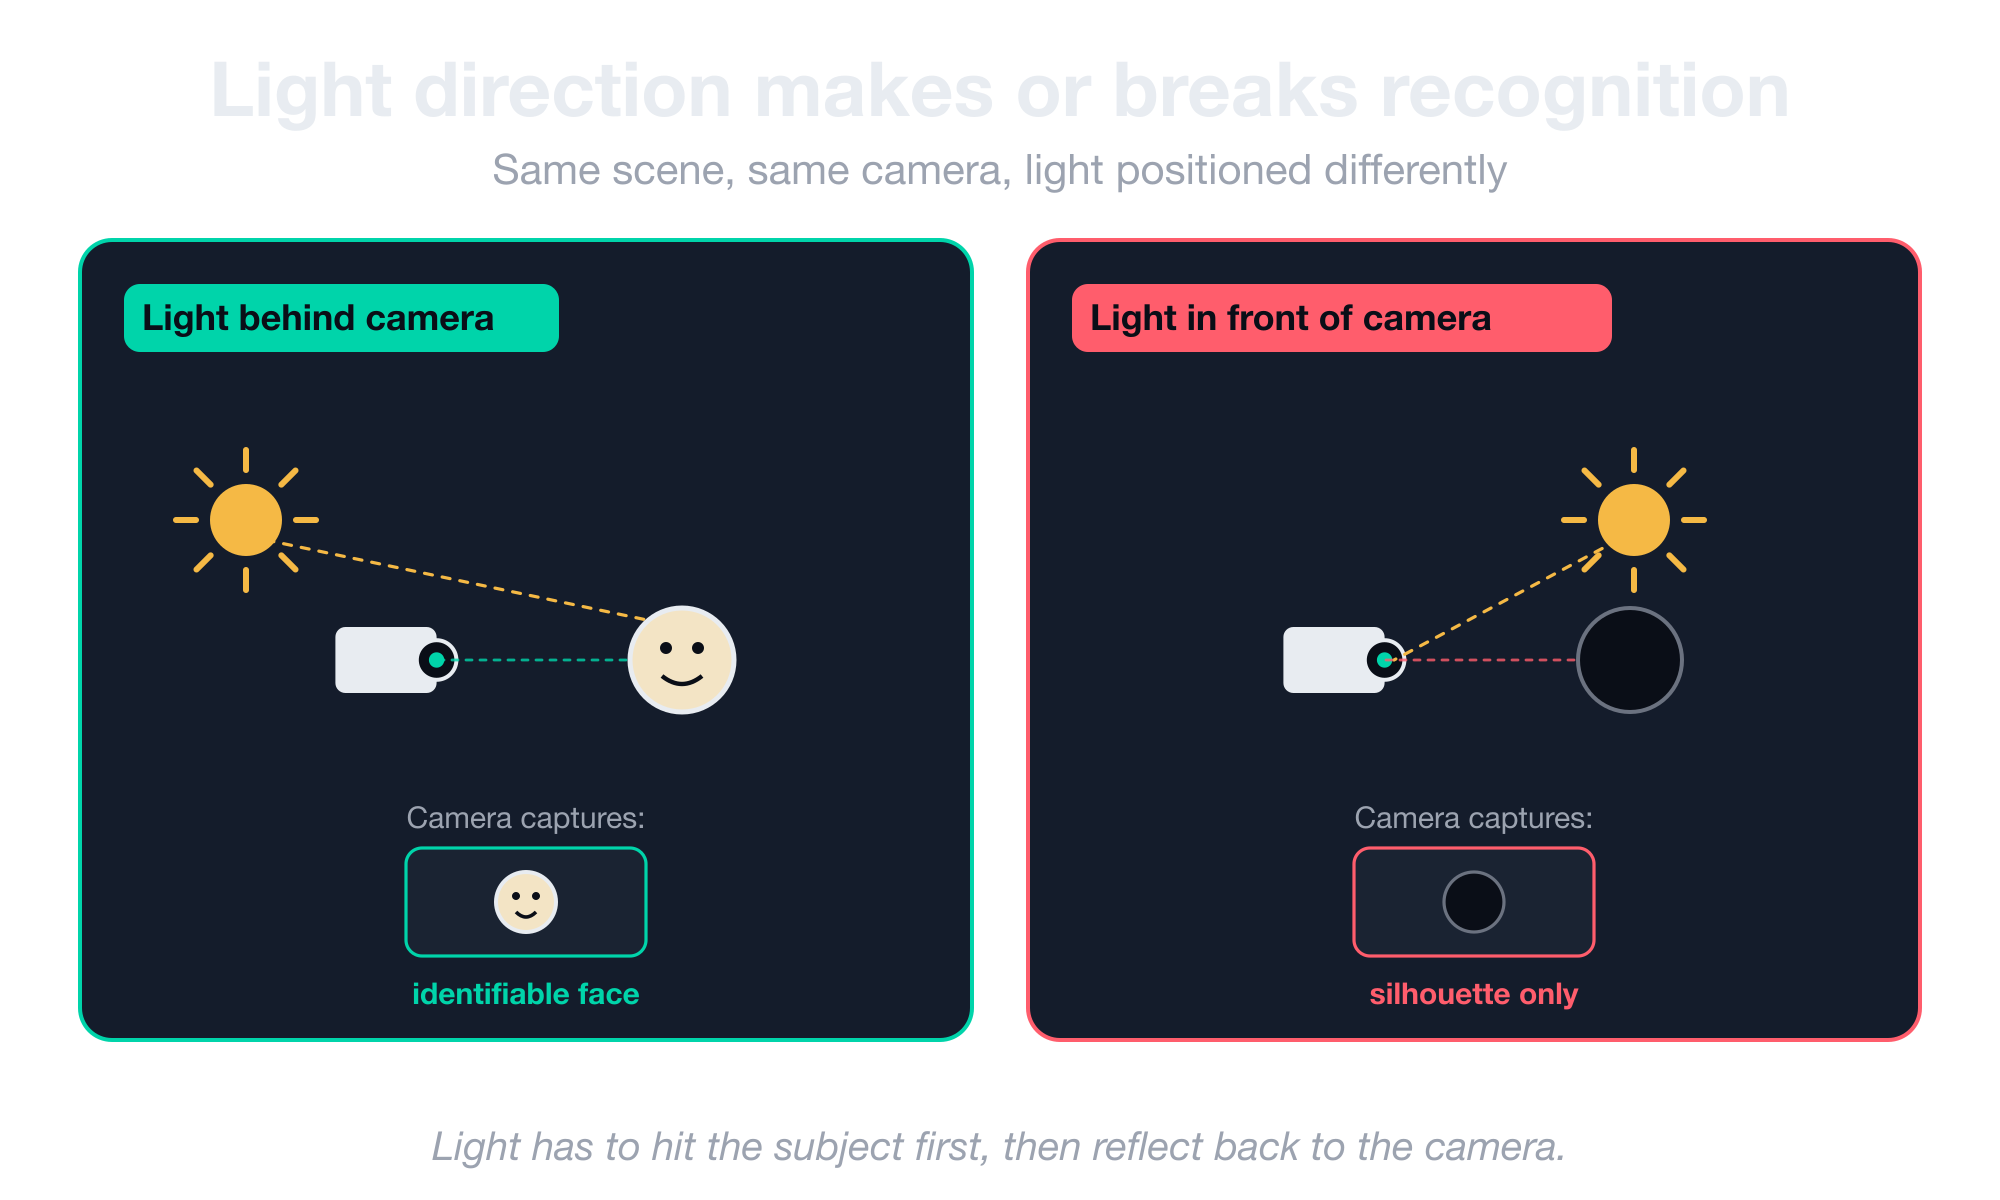
Where to position your light source
The first rule photographers learn applies directly to computer vision. Light has to be behind the camera, never in front of it.
When light hits the subject from behind the camera, the subject reflects it back, and the sensor captures the reflection. When light is in front of the camera, the sensor sees the light source directly, and the subject becomes a silhouette.
This mistake invalidates more deployments than any spec-sheet failure. Some common examples of how this plays out:
- A face-recognition camera mounted opposite a window sees clearly recognizable faces all morning and silhouettes all afternoon as the sun moves.
- A license plate camera pointed into oncoming headlights reads plates fine on overcast days and misses them on sunny ones.
- An outdoor camera installed without thought to shadow direction captures usable footage half the day and silhouettes the rest.
Pro tip: Audit your install site at sunrise, midday, and sunset before you bolt anything to a wall. The sun’s position changes more than people expect.
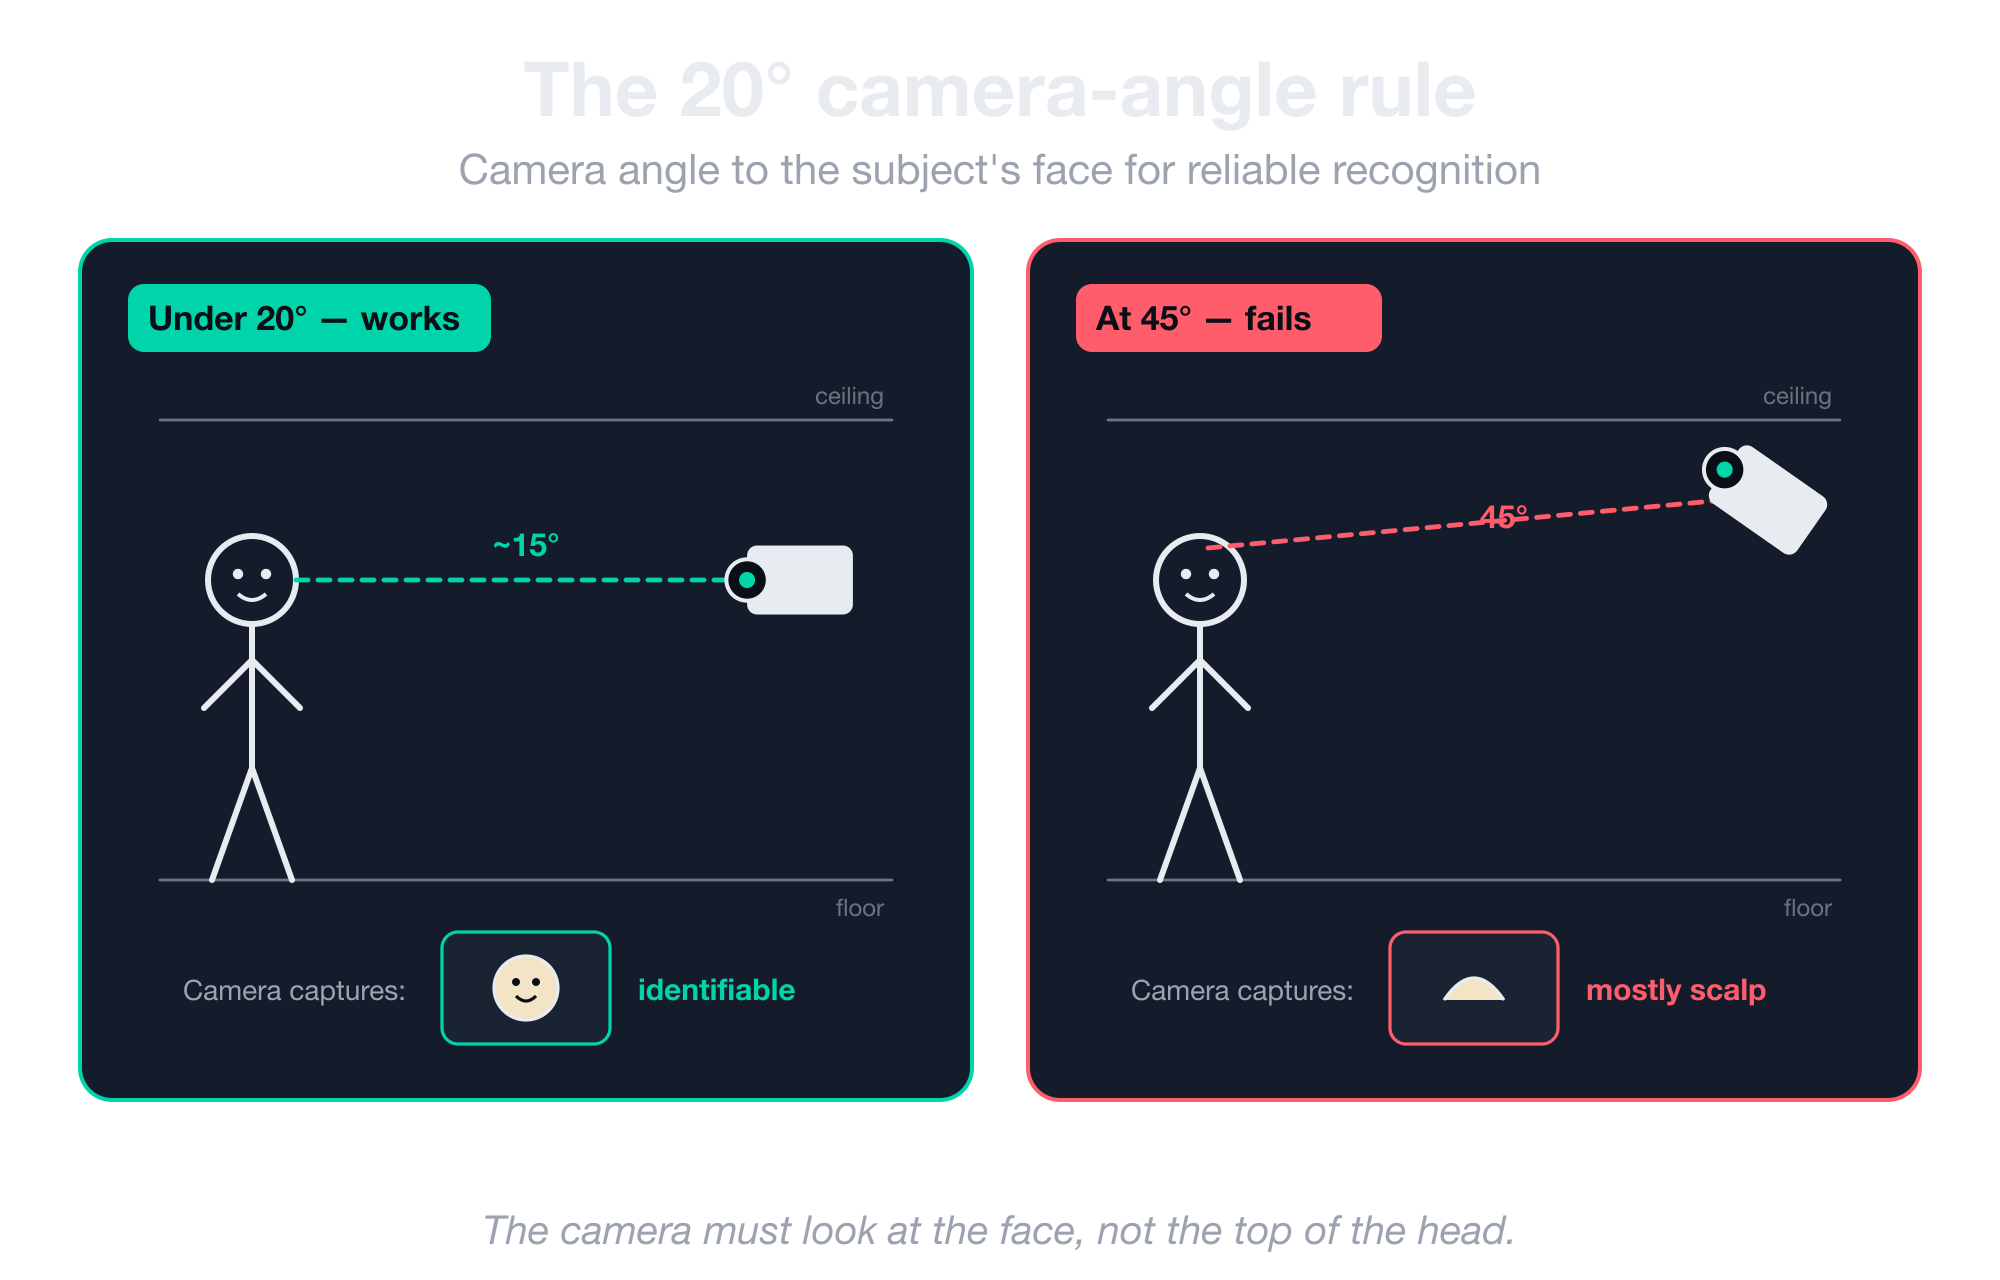
The 20° camera-angle rule for face recognition
Faces require the camera to look at the face and not the top of the head.
The acceptable camera-to-horizon angle for reliable face recognition is under 20 degrees, and a 45-degree downward angle is geometrically incompatible with the task, no matter what model or sensor you throw at it.
Here’s how this looks in the real world with CV installs:
- Airport face-recognition cameras are mounted at head height or just above, looking nearly horizontal down a corridor.
- Ceiling-mounted security cameras are useless for identification, even though they’re often called “face cameras” in marketing materials.
- Anyone who takes on a face-recognition deployment with the camera at 45 degrees is either inexperienced or willing to ship something that doesn’t work.
How many pixels do you need on a face
A face captured at 40 pixels wide is essentially useless to any modern face-recognition pipeline. The model needs roughly 120 pixels of face width to have enough signal to discriminate one person from another.
Below that threshold, the model can’t tell people apart reliably. This is a finding that holds up across years of NIST face-recognition benchmarks and recent academic research on low-resolution faces.
This rule, combined with the field-of-view-vs-pixel-density tradeoff, is what determines how far away the camera can be. It also determines how many cameras a corridor or square actually needs.
If you’re deploying face recognition like our facial re-identification pipeline, this calculation tells you where to mount the cameras, what lenses to put on them, and how many to buy.
Why long-focal cameras have tunnel vision
Airport ceiling cameras look almost parallel to the floor for a reason. They use long focal lengths, meaning they can see clearly down a 30-meter corridor but see almost nothing of the walls on either side.
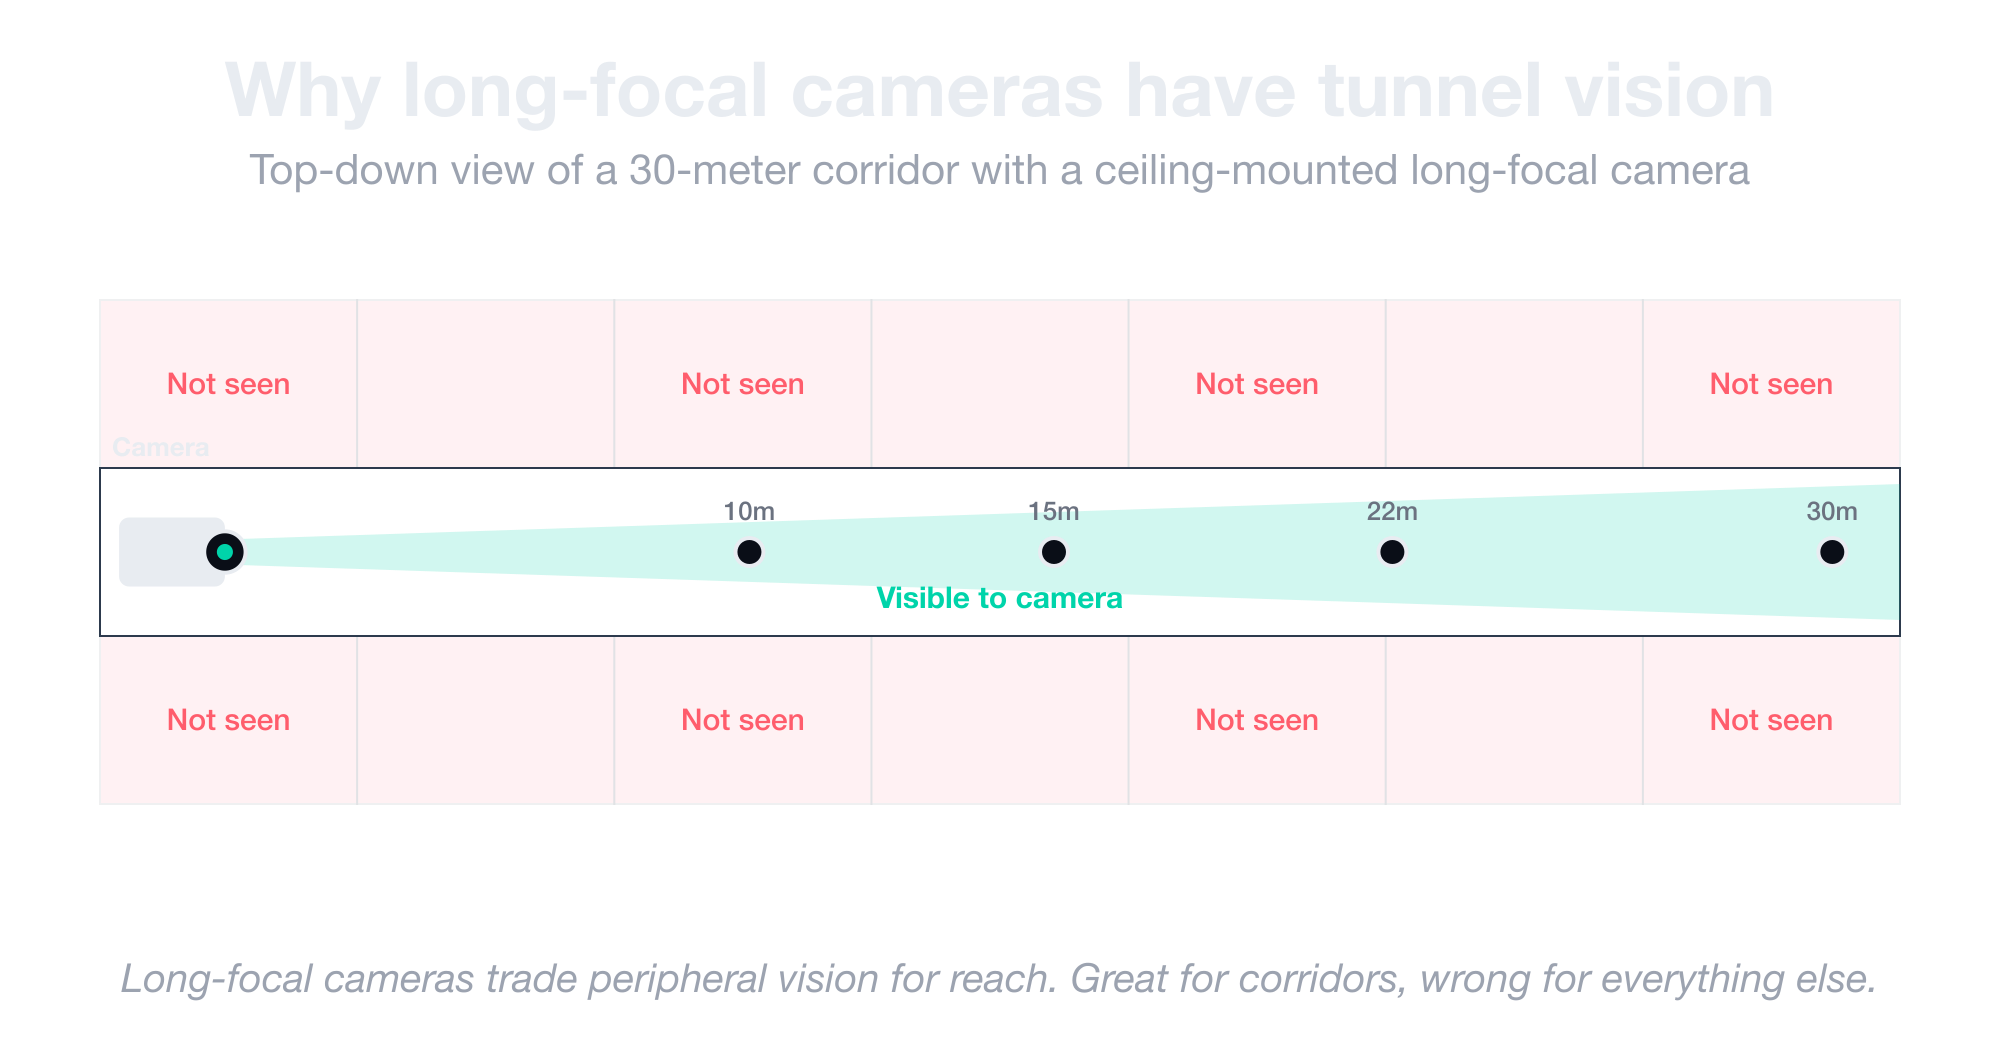
This works when you’re recognizing faces in a flow of people walking toward or away from the camera. But it fails for almost any other task. For instance:
- A long-focal camera installed in a parking lot sees one car clearly and misses every other car in the lot.
- A long-focal camera mounted in a warehouse sees one aisle and ignores everything happening 10 feet to either side.
- A long-focal camera trying to monitor a building entrance captures one person sharply but misses anyone who steps off the centerline.
The right move is to match the focal length to what you’re actually trying to observe. Use a wide angle for broad coverage and a long focal length for reach. There’s no single “balanced” lens that does both jobs well.
Why placement opposite a doorway usually fails
A camera mounted directly opposite an entrance seems ideal on the floor plan.
The reality is that most people turn immediately after walking through a door, which means the camera ends up with a corridor of profile shots and motion blur instead of clean frontal captures.
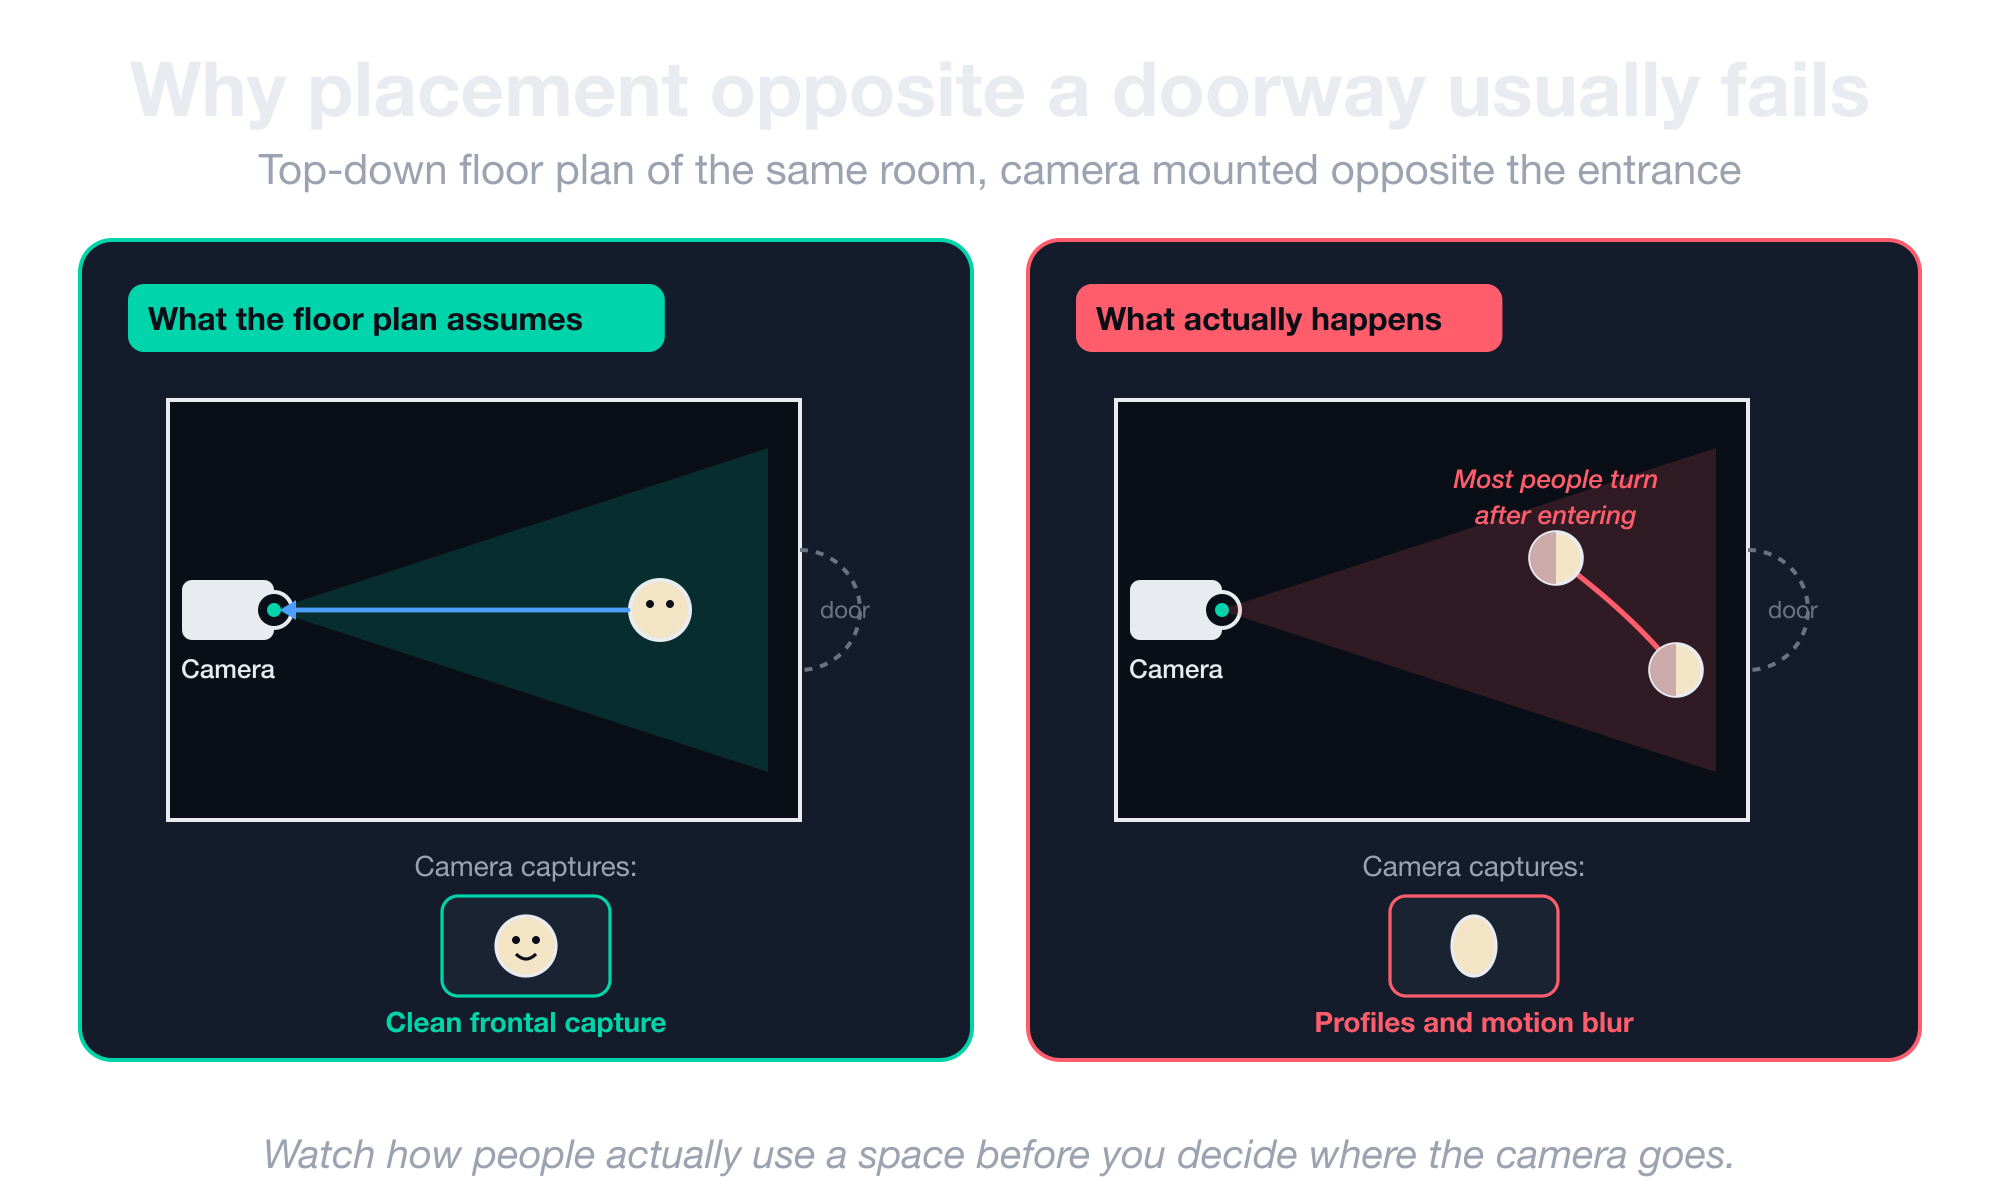
This is one of the most common installation failures in facial recognition deployments, and it usually happens for one of three reasons:
- The architect or facilities manager picks the position because it looks correct on paper.
- The system gets specified with a camera that could, in principle, recognize anyone walking straight at it.
- The footage in production turns out to be 80% sideways heads.
Installation has to be analyzed against actual human behavior rather than just the floor plan. You should watch how people use a space before you decide where the camera goes.
What spec sheets don’t tell you about Smart City camera latency
When you’re testing a computer vision system on your laptop with a saved video file, everything looks instant. The system reacts as fast as your code runs.
But the moment you hook up a real camera in a real building, a delay shows up between when something happens in front of the lens and when your software actually sees it.
This delay is the thing most spec sheets don’t mention, and it’s where Smart City projects break.
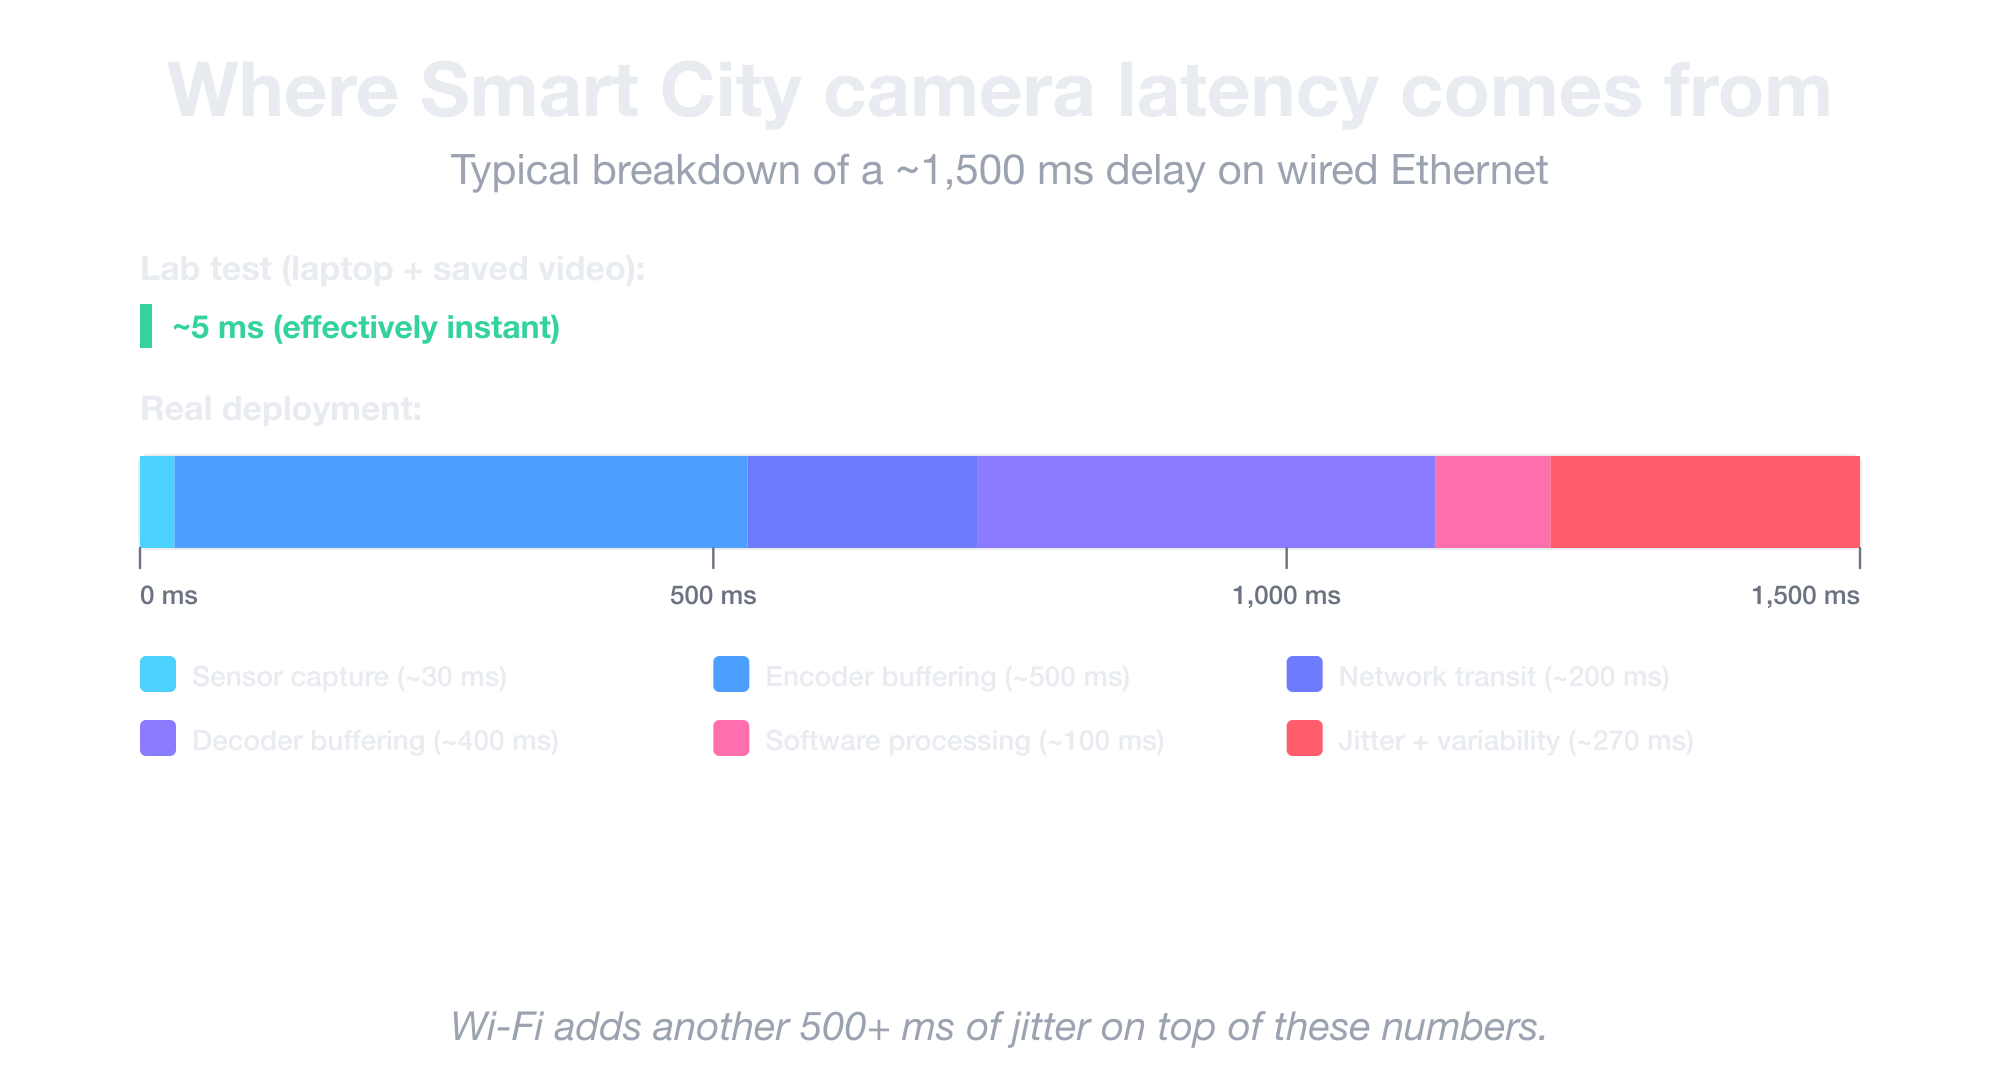
Here’s where that latency comes from:
- The 700 ms to 1.5 s baseline. That’s the typical delay on consumer Smart City cameras over wired Ethernet, from light hitting the sensor to a frame reaching your software. Wi-Fi adds another half-second or more on top.
- Latency that drifts inside a single camera. The same camera can swing between 700 ms and 1.5 s of delay depending on scene complexity, which quietly breaks any algorithm that assumes a fixed offset (like measuring vehicle speed between two road markers).
- Broken RTCP precision. RTCP Sender Reports are supposed to tell you when a frame actually occurred on the sensor, with millisecond precision. But most consumer cameras deliver around 100 ms of precision instead, and many spec sheets don’t even list this number.
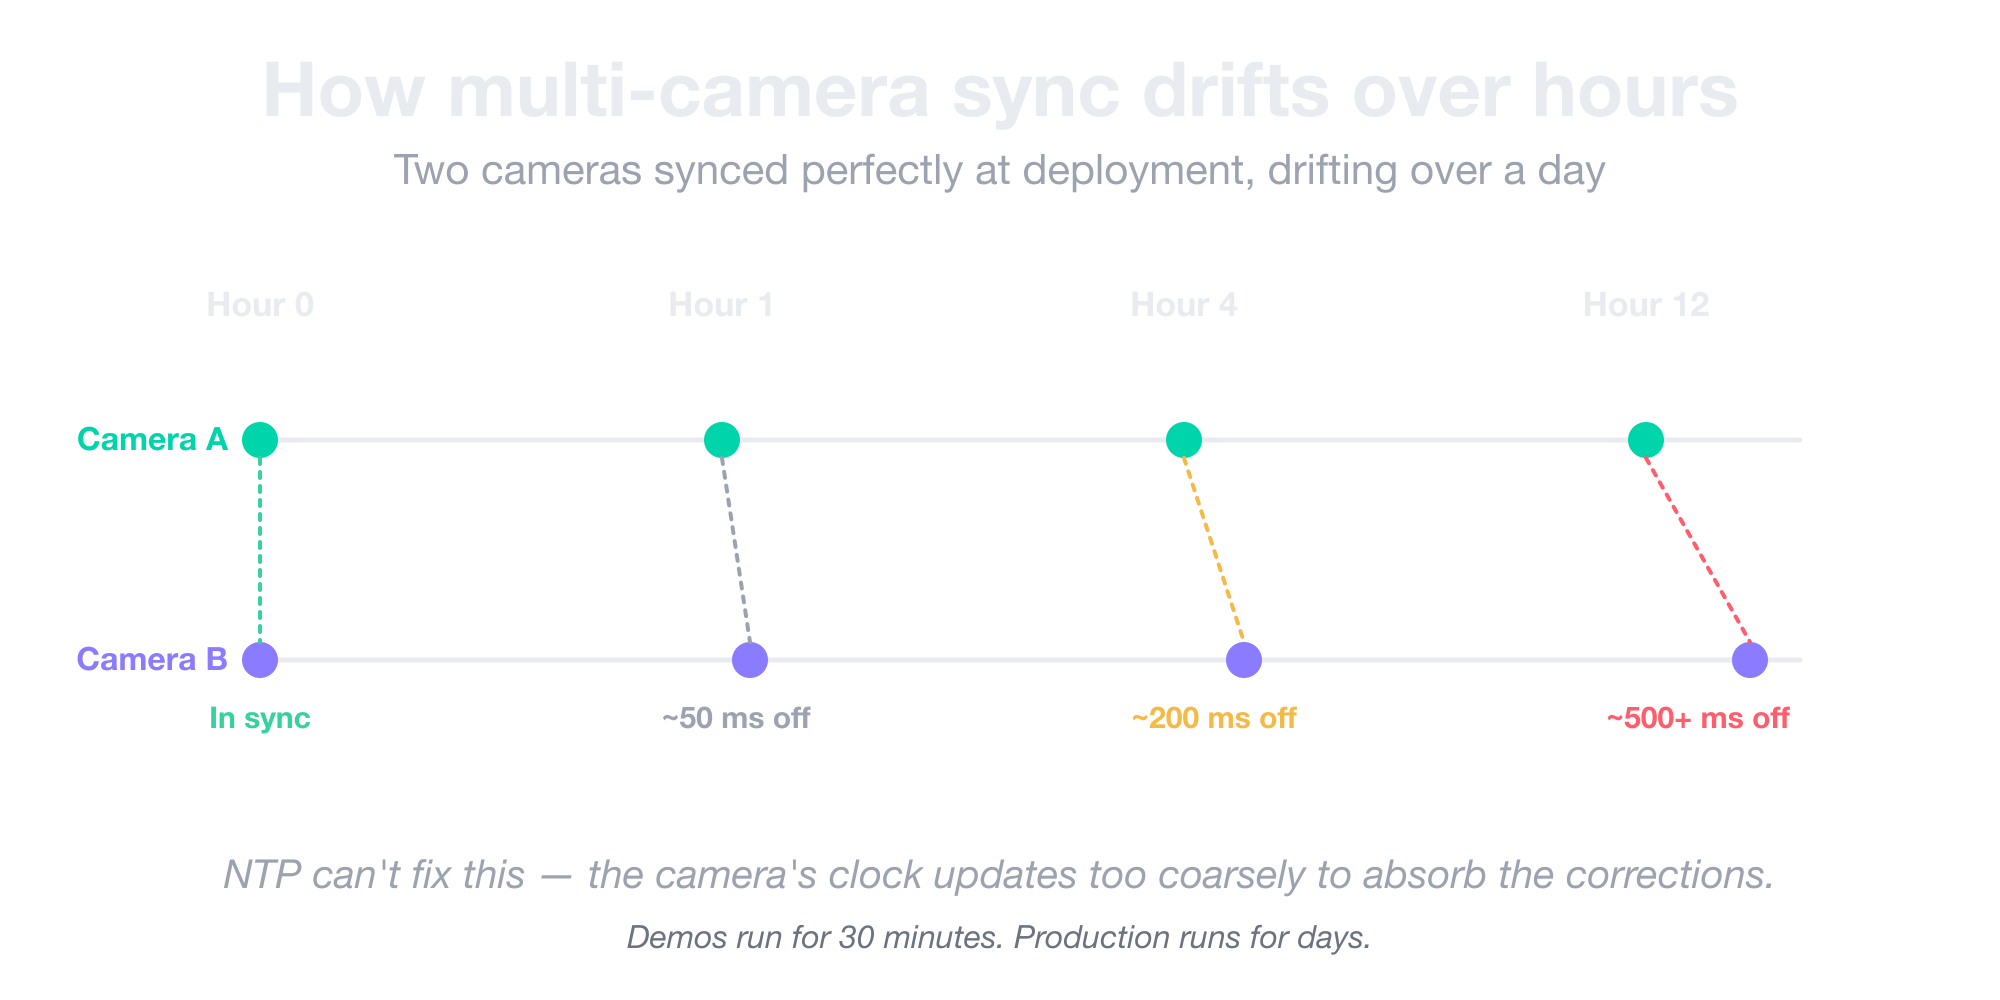
- Multi-camera sync drift over hours. Cheap quartz oscillators inside cameras run at 50–100 ms precision, and those tiny gaps add up the longer the camera runs. Two cameras synced perfectly at deployment will be visibly out of sync a few hours later, and NTP can’t fix it either.
Note: Most consumer Smart City camera spec sheets don’t list RTCP precision at all. Ask the vendor directly before you commit. If they can’t answer, the answer is “around 100 ms,” which means you can’t trust the timestamps.
If you’ve hit problems like these and need help debugging them, our computer vision team has done this work in production.
When you need an industrial camera (and when you don’t)
The moment a Smart City camera can’t keep up with your project, you’ve crossed into industrial territory, whether you wanted to or not. Industrial cameras come from different vendors, plug in with different connectors, and cost a lot more.
For example, a 640×480 grayscale industrial camera running at 600 frames per second can cost €2,000 because only one vendor makes it and the customer has nowhere else to shop.
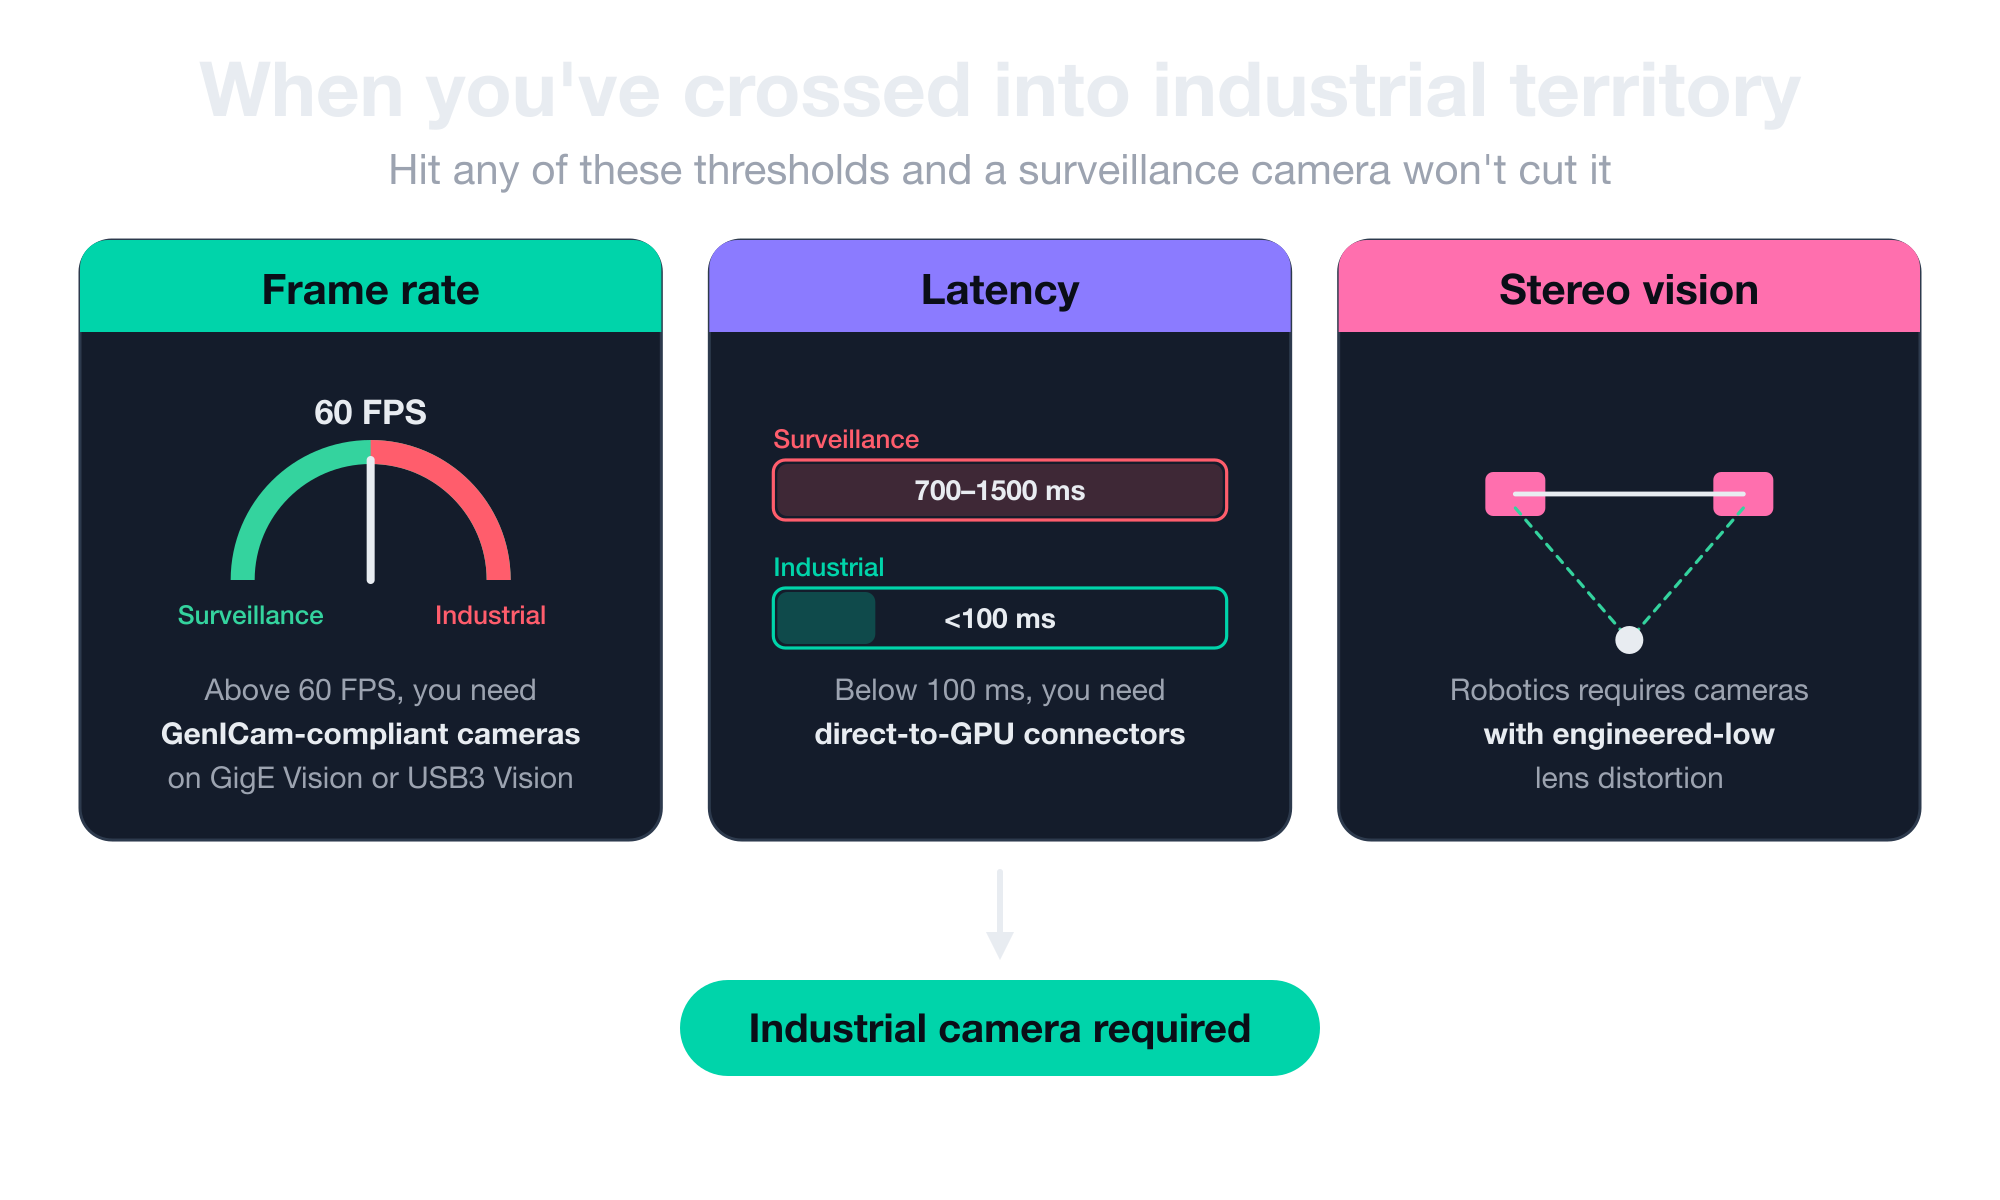
Three things usually push you into an industrial camera for your project:
- Frame rate above 60 FPS. Once you need more than 60 frames per second, you’re shopping for GenICam-compliant industrial cameras on GigE Vision or USB3 Vision interfaces.
- Sub-100-millisecond latency. When your software has to react in under a tenth of a second, you need direct-to-GPU connectors like MIPI CSI-2 instead of standard Ethernet.
- Calibrated stereo vision for robotics. Anything that involves a robot picking up an object or navigating a space needs industrial cameras with engineered low lens distortion so the system can calibrate accurately.
But here’s the bigger point: industrial cameras cost a lot more, but they do things surveillance cameras simply can’t handle.
For instance, a factory inspecting glass bottles flying down a conveyor at 300 frames per second needs a camera built for that exact problem. But a surveillance camera mounted in a parking lot does not. Trying to use one for the other ends with a useless deployment, no matter how much you spend.
Savant, our open-source CV framework on NVIDIA DeepStream, was built specifically for this class of high-FPS, low-latency pipeline.
Real-world example of choosing a license plate recognition camera
License plate recognition sounds like one problem until you build it three times and realize it’s three completely different camera specifications under the same name.
Each variant has a different angular velocity profile, observation window, and optimal spec. Walking through all three is the easiest way to make the case for use-case-first selection.
Let’s start with the first one.
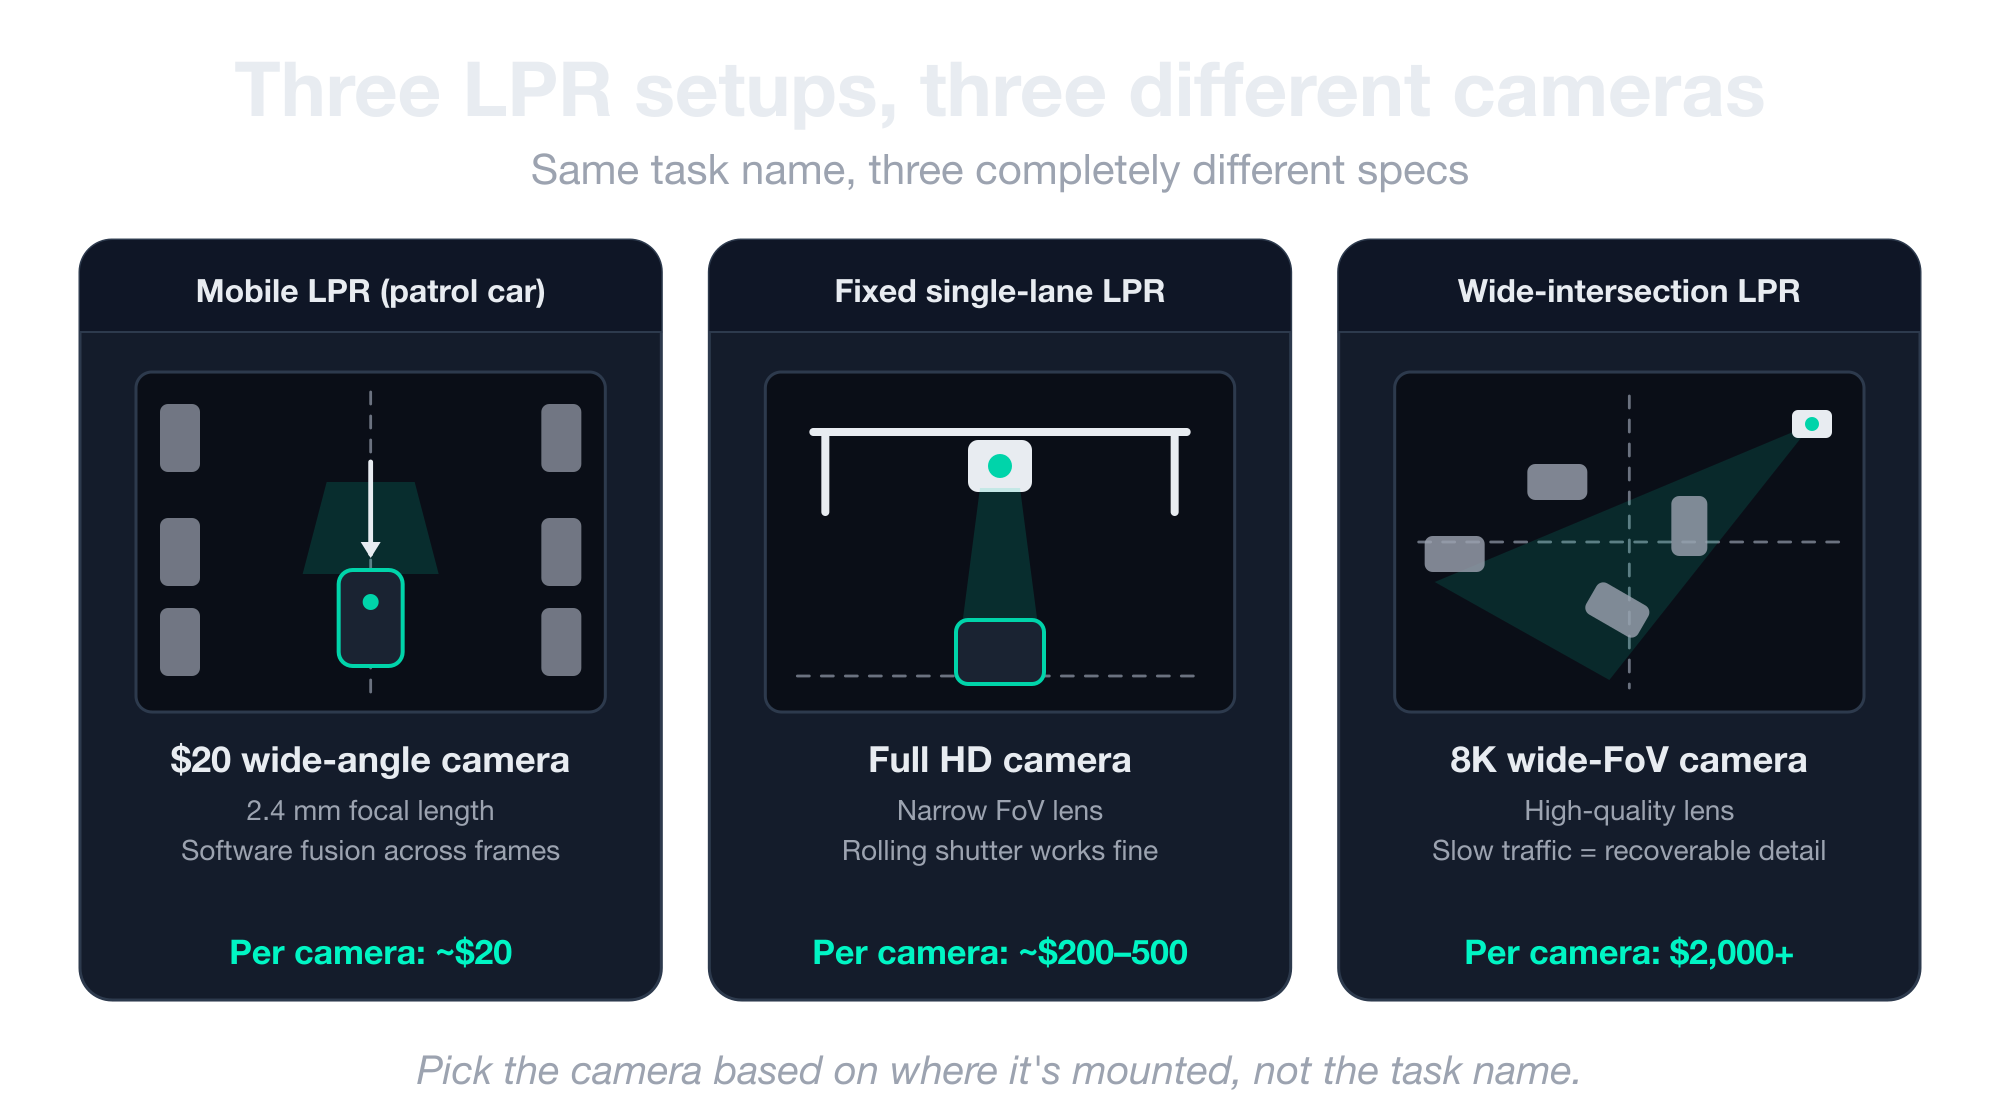
Mobile LPR cameras (vehicle-mounted)
Here’s a real example. A municipal parking enforcement operation deployed 1,000 cameras across 200 patrol cars to read plates on parked vehicles as the cars drove through neighborhoods.
They originally ran the whole fleet on generic $20 wide-angle units with a 2.4 mm focal length, which is the kind of cheap camera you’d put in a backyard to watch a dog.
It worked well enough that they eventually went directly to a manufacturer in China to OEM a custom version, because nothing else on the market actually matched their specs at scale.
Why this works on cheap cameras:
- The plates are close to the lens. Resolution barely matters when the plate fills a decent chunk of the frame anyway.
- The real challenge is rolling-shutter blur. Every time the patrol car drives past a parked vehicle, the plate is moving sideways across the frame, which is the worst-case scenario for a cheap rolling-shutter sensor.
- The fix isn’t a better camera, it’s a longer look. A 5-second observation window gives the software enough time to capture dozens of frames of the same plate.
- Software fusion does the heavy lifting. The algorithm compares every plate read across those frames, weights them by which characters appear most often, and outputs a probabilistic best guess that beats any single frame.
In a setup like this, the camera is almost the cheapest part of the system because the software does nearly all the work.
Fixed single-lane LPR cameras
The easiest LPR setup is anywhere a car has to drive through a single lane at a known speed. Community entrance gates, highway toll gantries, and parking garage barriers all fit this pattern.
Why a cheap camera works here:
- A narrow field-of-view lens frames only the lane. All your pixels point at the plate instead of getting wasted on the surroundings.
- The subject moves slowly through a known path. Angular velocity stays low, which means motion blur stays low too.
- A rolling shutter handles it fine. At these speeds, there’s no need to pay for global shutter.
A Full HD camera with the right lens beats an 8K wide-angle every time in this setup. This is also the sub-case most readers will land on, and the one most over-specified by buyers who confuse “important” with “expensive.” A $2,000 camera here would be wasted budget. If you want to see the software side, take a look at our license plate recognition demo.
Wide-intersection LPR cameras
Wide-intersection LPR is the opposite of the single-lane case. Instead of one car driving through a controlled lane, you’ve got cars moving in every direction across a chaotic intersection. It’s also the only LPR variant where high resolution actually earns its price.
Why an expensive camera wins here:
- Objects move slowly through congestion patterns, so the camera has time to collect detail across many frames.
- Each plate occupies a small fraction of the frame, but the crop still has enough pixels to recover the read.
- Cars often sit at the intersection for 10 to 30 seconds, which gives the software multiple shots at every plate.
Lens quality matters most in this setup. Distortion at the edges of an 8K frame will tank recognition on plates at the periphery of the intersection, so cheap wide-angle lenses fail even when paired with expensive sensors.
How to determine if your subject is moving too fast for your camera
Rather than asking “is the camera moving?”, the right question is “what’s the angular velocity of the target relative to the camera?”
That number determines how fast a shutter you need, which in turn determines how much light, which then determines the sensor and lens.

Here’s what that means in practice:
- Fast subjects in dim conditions are the hardest CV problem. That combination is why face recognition and plate reading on moving targets cost what they cost. Plan accordingly.
- Slow subjects forgive almost everything. A crowded intersection lets you get away with cheaper sensors and longer shutters because observation time covers the gaps.
- Sometimes a speed bump beats a better camera. A barrier, a speed limit drop, or a single-file chokepoint reduces your subject’s angular velocity and shrinks the camera problem before you spend a dollar on hardware.
The last point is the one that most CV guides miss entirely. A physical change in the installation environment is often cheaper, faster, and more reliable than upgrading the sensor.
Why optics matter more than megapixels
Smartphone marketing has taught consumers to look for megapixels when purchasing cameras. For computer vision, it’s especially important to ignore this and search for lens quality, sensor sensitivity, and shutter precision.
![]()
Below are four reasons optics matter more than megapixels for CV work:
- Optics determine what reaches the sensor in the first place. A Full HD camera with a sharp, low-distortion lens beats a 4K camera with a cheap lens because adding pixels behind a bad lens just gives you a higher-resolution version of a useless image.
- Pixel binning is why phone megapixel counts lie. A 64 MP-sensor phone outputs roughly 16 MP of effective image after the sensor combines neighboring pixels and the ISP runs interpolation.
- Industrial cameras back this up to the extreme. A 640×480 grayscale industrial camera with proper optics outperforms a 4K consumer camera for any task where image fidelity matters more than scene coverage.
- The human eye sits at roughly 64 MP. The best consumer cameras output around 16 MP pixel-for-pixel, and the gap between the two is what virtual reality is slowly closing. Your eyes are still better than the best camera you can buy.
Before you compare resolution numbers between two cameras, compare their lens specs and sensor sensitivity. If you’re spec’ing for computer vision, those two factors decide the outcome far more than pixel count does.
Which CV camera brands you need to know
There are three groups of CV camera vendors worth knowing, including surveillance, industrial, and the developing-market segment. Here’s what to know about each and the top brands to consider in each one:
- Axis (Sweden, sold in the US, around $500 per camera). The default premium option for US deployments. They are expensive, but flexible across configurations, with strong low-light performance and a wide model range.
- Hikvision and Dahua (China, dominant in the rest of the world). Restricted in the US under NDAA Section 889 for federal procurement. If you’re spec’ing for any government-adjacent buyer, confirm compliance before you commit.
- Industrial is a separate vendor list. Names like Basler, Allied Vision, FLIR, Sony, and the Mech-Mind class dominate this segment. Each is strong in different niches, and the right pick depends on your specific application. Research these against your actual frame rate, distortion, and connector requirements rather than picking by name recognition.
- Developing markets run on $20 cameras and edge processing. In places like India, cameras over $20 are considered expensive, and there usually isn’t enough internet bandwidth to send video to a remote server for processing. So the camera has to do all the analysis itself.
Pick your vendor based on your use case, your compliance requirements, and your geographic deployment. There is no global best choice for everybody.
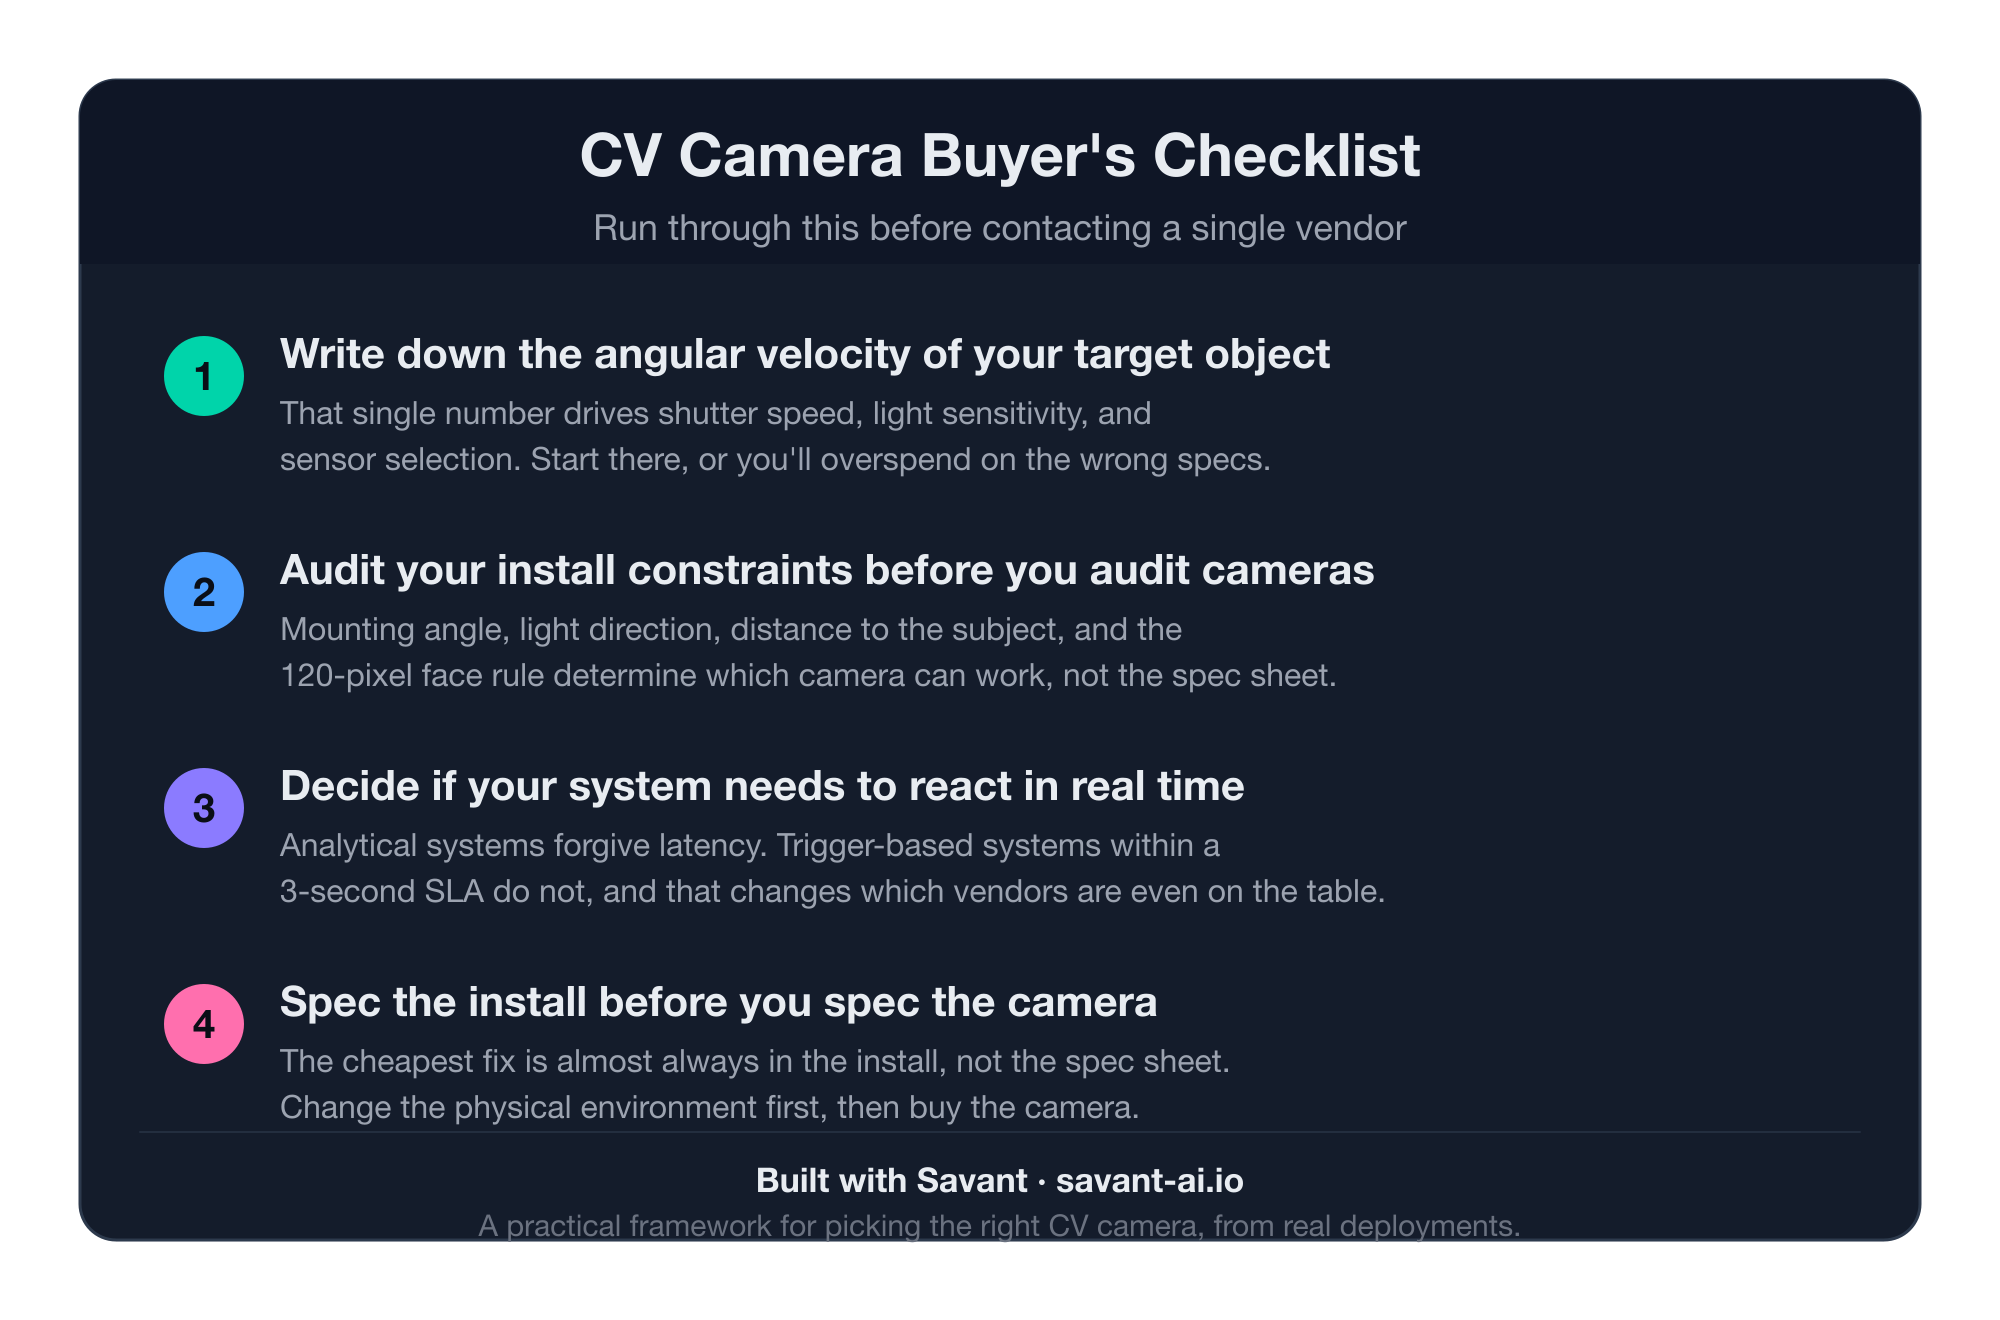
Your CV camera buyer’s checklist
Before you contact a single vendor, run through this list. Each item compresses one section of this guide into something you can act on.
- Write down the angular velocity of your target object first. That single number drives shutter speed, light sensitivity, and sensor selection. Start there, or you’ll overspend on the wrong axes.
- Audit your install constraints before you audit cameras. The mounting angle, light direction, distance to the subject, and the 120-pixel face rule determine which camera can work, not the spec sheet.
- Decide if your system needs to react in real time. Most CV projects review footage later, but some have to act within seconds. For example, a trigger-based system operating within a 3-second SLA has to react before the window closes, which rules out most consumer cameras on latency alone.
- Spec the install before you spec the camera. This is the headline rule of the article and the cheapest one to follow. If you can change the physical environment to slow your subject, narrow the field of view, or fix the lighting, do that before buying anything.
If you’ve worked through this checklist and want help executing, our computer vision team has shipped this work in production across surveillance, LPR, and industrial deployments. Get in touch and tell us what you’re building.
Frequently asked questions about computer vision cameras
Is global shutter worth the extra cost?
Global shutter is worth the extra cost only if your subjects move fast relative to the camera. It eliminates rolling-shutter blur on moving subjects, which matters for license plate recognition, sports, and conveyor inspection. For static or slow scenes, rolling shutter is cheaper and works fine.
How many pixels do I need on a face for reliable recognition?
Around 120 pixels of face width is the threshold for reliable face recognition with modern models. At 40 pixels, accuracy declines. Your field of view determines how close the camera has to be and how many cameras a space actually needs.
What’s the typical end-to-end latency of a Smart City camera?
Between 700 milliseconds and 1.5 seconds on consumer IP cameras over wired Ethernet, with Wi-Fi adding another half-second of jitter. The latency also drifts, so any algorithm assuming a fixed offset will eventually break. Industrial cameras can hit sub-100-millisecond latency.
Is 4K better than 1080p for computer vision?
Not necessarily. A 1080p camera with a sharp lens, fast shutter, and good light sensitivity beats a 4K camera with cheap optics for almost every CV task. Adding pixels behind a bad lens just gives you a high-res version of a useless image.
Can I use a $20 camera for license plate recognition?
Yes, in some setups. Mobile LPR works on $20 cameras because plates are close to the lens, and software fusion recovers accuracy across noisy frames. Fixed single-lane LPR also works on cheap cameras. Wide-intersection LPR generally does not.